 minute read
Register the MDA App with the MDA Console
Imprivata Mobile Device Access customers configure the MDA app to correctly communicate with the appropriate MDM system for their Android devices.
When the MDM deploys the MDA app to the devices, it passes several bits of information back to the Mobile Access server to correctly identify the MDM and allows you to track the deployment activity of the devices in the MDA console and device dashboard.
Prerequisites
This procedure assumes the following:
-
Your Android devices are running Imprivata MDA 10.0 or later.
-
The Imprivata appliances in your enterprise are running a supported release of EAM. For more information, see the Imprivata Environment Reference portal.
-
You previously configured your MDM to deploy the Imprivata MDA app to your devices.
NOTE:The configuration tasks in this topic supplement the MDA deployment topics for the following MDMs:
-
In your MDM, you have enabled API integration.
Requirements
-
The Imprivata MDA app must be granted Lock Task permissions in the MDM.
-
The Imprivata MDA app must be added to the allowlist in your MDM.
Step 1: Gather API Integration Information from the MDM Admin Console
Using your MDM's admin console, gather your MDM's API integration information for use in the MDA Console when adding API settings.
The MDA console and your MDM require API settings from each other. Open both consoles at the same time so that you can easily transfer information.
 Microsoft Intune
Configure API access in Microsoft Intune.
Determine the Permissions Model for the Authentication Method
Depending on your organization's needs, you can use one of the following permissions models as the authentication method for MDA.
-
Application permissions - Imprivata MDA app runs in the background without a signed-in user. See Option 1: Application Permissions.
-
Resource Owner permissions - the authentication method for delegated permissions.
The resource owner authorizes Imprivata MDA to access the resource on its behalf. See Option 2: Resource Owner Permissions.
Microsoft Azure Setup
-
Log into your Microsoft Azure tenant at portal.azure.com.
-
Search for the service App registrations.
-
Click + New registration to add a new registration. Name the application "MDA API Access" or something similar.
-
Choose Accounts in this organization directory only from the list of supported account types.
-
Leave the Redirect URI blank.
-
Click OK to create the application.
After registering a new application, you can find the Application (client) ID and Directory (tenant) ID from the overview menu option.
Copy both the Application (client) ID and the Directory (tenant) IDs to a safe place. You will use these in the MDA console in a later step.

-
In the vertical navigation bar, select API permissions.
-
Select the Microsoft Graph API.
Option 1: Application Permissions
To use Application permissions:
-
Select Application permissions.
-
-
Device.ReadWrite.All,
-
DeviceManagementManagedDevices.PrivilegedOperation.All
-
DeviceManagementManagedDevices.ReadWrite.All
-
DeviceManagementServiceConfig.ReadWrite.All
-
GroupMember.ReadWrite.All
-
If your environment utilizes Azure shared iOS devices, add User.Read as a Delegated Permission for authenticating to Microsoft apps.
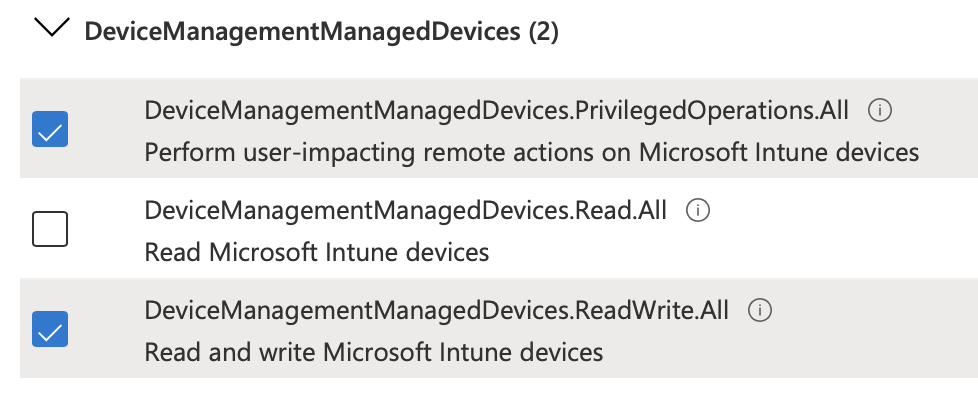
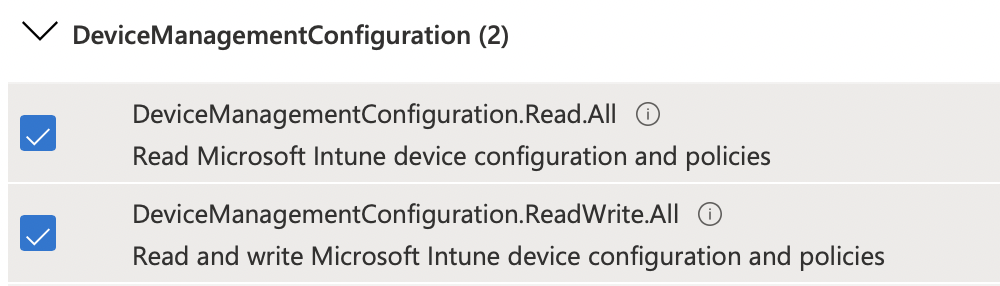
-
-
Click Add Permissions.
-
Grant permissions to the newly-created application. At the top of the permission list is an action Grant admin consent for <company name>.
-
Consent to allow the application to access your Intune managed devices.
-
In the vertical navigation bar, click Clients & Secrets.
-
Click New client secret.
-
Name the new secret with a meaningful description.
-
Select the expiration for the client secret. You may choose any value, but if it expires you must regenerate a new secret and load it into MDA.
-
Add the new secret, copy the value, not the ID, and store it in a safe place. You will add the client secret value in the MDA console in a later step.
-
You may now close Azure.
Option 2: Resource Owner Permissions
Requirements
Using Resource Owner permissions requires the following:
-
Microsoft Intune Plan 1 Device license.
-
Configure the following items in Intune:
-
Create a custom role assignment for the Policy and Profile Manager role.
-
Grant the custom role the appropriate sets of permissions to manage compliance policy, configuration profiles, Apple enrollment, Android Enterprise enrollment profiles and corporate device identifiers.
-
| Item | Permission |
|---|---|
| Corporate device identifiers |
Read |
| Enrollment programs |
Read device Assign profile |
| Managed devices |
Read Delete Query |
| Remote tasks |
Wipe Reset passcode Enable lost mode Set device name Send custom notifications Remote lock Disable lost mode Sync devices |
-
Assign the custom role to a user.
NOTE:Take note of this user and its password. You will add the value in the MDA console in a later step.
-
Use scope tags to ensure that your Intune admins have the correct access and visibility to the Locker app.
-
Add the scope tag to your token name in Enrollment program tokens (Devices | Enrollment > Enrollment program tokens).
-
Add the scope tag to the policies and profiles that you want admins to have access to.
Configure Resource Owner Permissions
To configure Resource Owner permissions:
-
In Intune, go to the MDA API Access application, go to the Manage > Authentication menu.
-
In the Settings section, switch the Allow public client flows setting to Enabled.
-
Select Delegated permissions.
-
Add permissions for:
-
Device.Read.All
-
DeviceManagementConfiguration.ReadWrite.All
-
DeviceManagementManagedDevices.PrivilegedOperations.All
-
DeviceManagementManagedDevices.ReadWrite.All
-
DeviceManagementServiceConfig.ReadWrite.All
-
Group.Read.All
-
GroupMember.ReadWrite.All
-
User.Read
-
-
Click Add Permissions.
-
Grant permissions to the newly-created application. At the top of the permission list is an action Grant admin consent for <company name>.
-
Consent to allow the application to access your Intune managed devices.
-
Go to the Enterprise Application list select newly created app and add the Resource Owner account to the Users list.
Configure API Access in MAM
-
In the MAM console, go to Admin > MDMs.
-
To add a new MDM, click Add and select Intune.
-
Type a descriptive name in the MDM Name box.
-
Skip the enrollment profile.
-
Switch API Integration to ON and click Configure.
-
In the Microsoft Intune API dialog, configure the following information:
-
In the Use delegated permissions, select one of the options as the authentication method: Application or Resource Owner.
-
In the Client ID box, type the Client ID of your Azure environment. In Azure, this value is named Application (client) ID; you saved this value in an earlier step.
-
If Application is your authentication method for delegated permissions, in the Client Secret box, type the client secret you saved earlier.
-
If Resource Owner is your authentication method for delegated permissions, type the Resource Owner Username and Resource Owner Password.
-
-
In the Tenant ID box, type the tenant ID of your Azure environment. In Azure, this value is named Directory (tenant) ID; you saved this value in an earlier step.
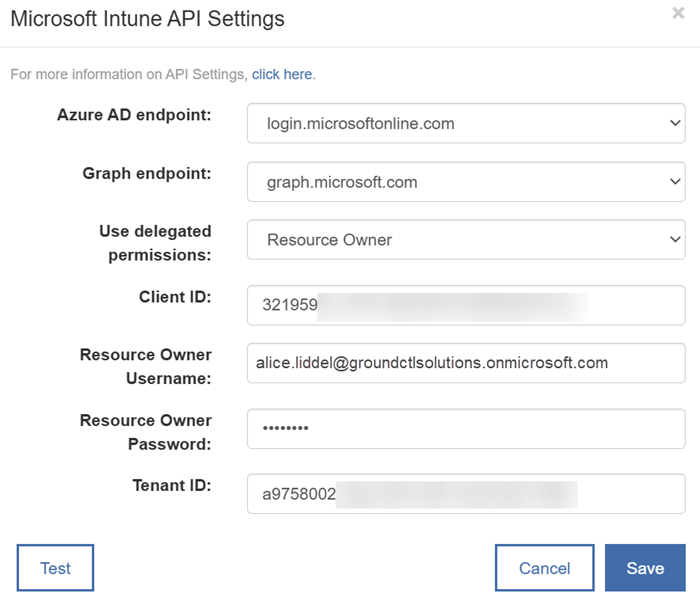
-
-
Click Test to verify connectivity.
Omnissa Workspace ONE
-
Imprivata strongly recommends you use a local Workspace ONE admin account for Mobile Access APIs. Avoid Active Directory accounts. Active Directory admins slow each API call by two seconds, which will make your checkouts slower.
-
Set up certificate authentication for the local admin user, which will avoid periodic password expirations.
Enable REST APIs in Workspace ONE
To enable REST APIs:
-
In your Workspace ONE UEM console, visit Groups & Settings > All Settings > System > Advanced > API > REST API > General.
-
Ensure that Enable API Access is selected.
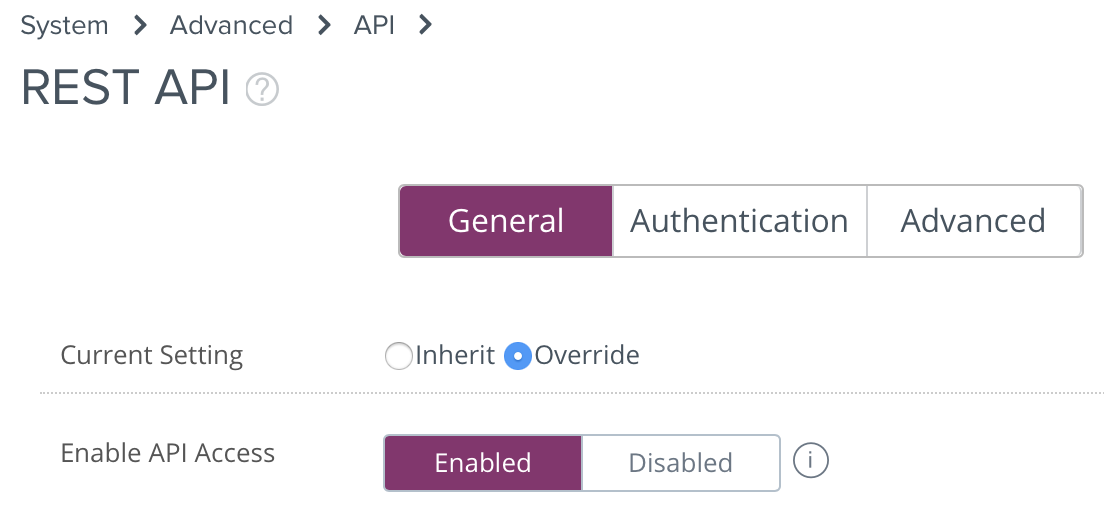
-
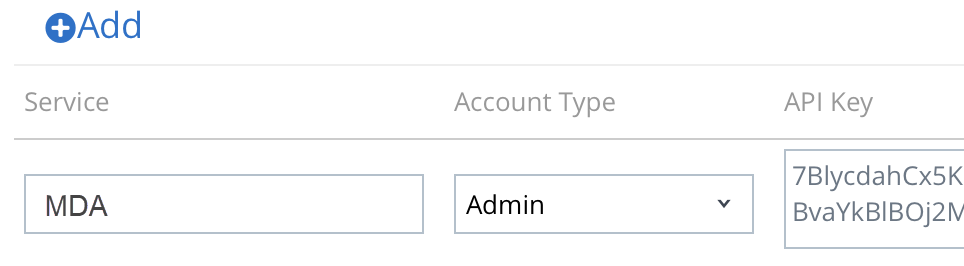
Add a new API key, and label it "MDA".
-
Copy the newly created API key and save it for a later step.
-
Copy the hostname of the REST API URL, for example “as700.awmdm.com”. Do not include "https" or a trailing slash. Save it for a later step.
NOTE:This may be different from your Workspace ONE console URL. See Omnissa KB 82724 for more information.
After enabling APIs, create a dedicated administrator account for API authentication, ensuring the administrator has a role of Console Administrator or above. Then, select an authentication method using Option 1 or 2 below.
Option 1: Authenticate with User and Certificate
To configure authentication with user and certificate:
-
In Workspace ONE admin console, go to the Authentication tab. Ensure Certificate authentication is enabled.
-
In Accounts > Administrators > List View, select or create a Workspace ONE administrator account to use with MDA. Use a Basic or Directory account.
-
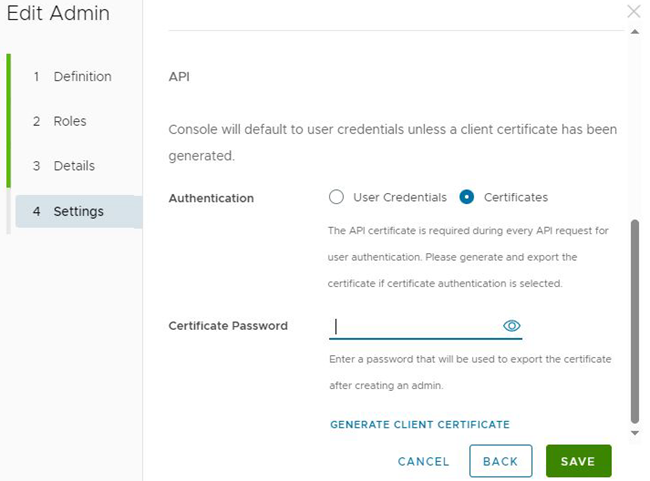
To enable API access for one of your administrator accounts, edit the administrator and click the API tab.
-
Select Certificates, then enter a Certificate password and click Generate Client Certificate.
-
Export the client certificate and click Save.
-
-
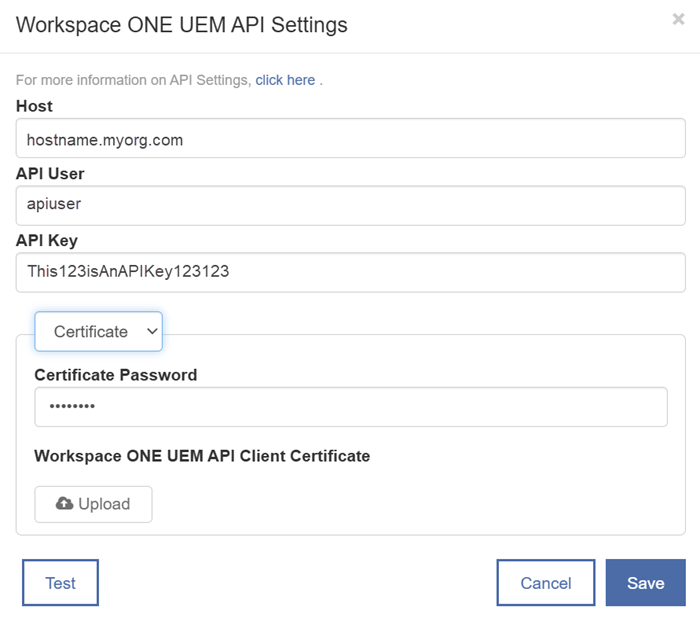
In the MDA console, upload the certificate, enter the admin username and the certificate password you just created.
-
Click Test to confirm connection has been established. Click Save.
IMPORTANT:If the API admin user account is locked, authentication will fail. Make sure the admin account is unlocked by resetting the user’s password.
If the API admin user’s password expires, API integration will continue to work as expected.
-
Option 2: Authenticate with Username and Password
To configure authentication with username and password:
-
In Workspace ONE admin console, go to the Authentication tab. Ensure Basic authentication is enabled.
-
In Accounts > Administrators > List View, select or create an Workspace ONE administrator account to use with MAM. You can use a Basic or Directory account.
NOTE:If using this method, Imprivata recommends a dedicated directory account for MAM, and using certificate based authentication as Workspace ONE may enforce a periodic password change for Basic users.
-
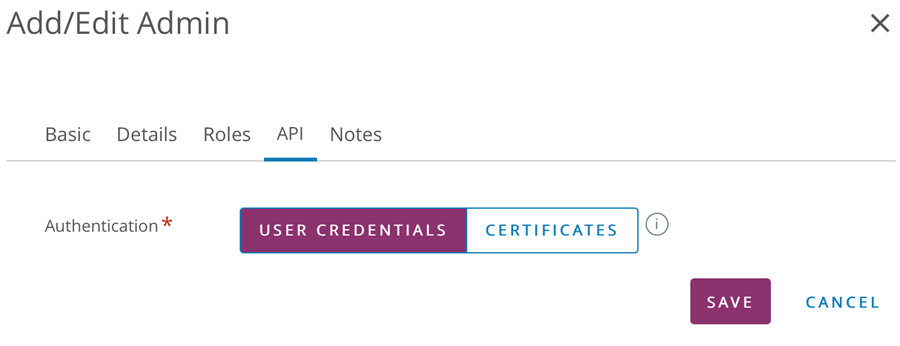
To enable API access for one of your administrator accounts, edit the administrator, and click the API tab. Make sure Basic authentication is enabled.
-
In the Roles tab, ensure the administrator has a role of Console Administrator or above.
IMPORTANT:Each Administrator must log in once to the Workspace ONE console to accept the terms and conditions.
-
In the MDA console, enter this Workspace ONE administrator username and password in the API Settings dialog.
-
Click Test to confirm connection has been established. Click Save.
-
SOTI MobiControl
-
In the SOTI MobiControl console, go to Global Settings > Services > API Client.
-
On the API Client page, click Add API Client.
-
Enter a name for the API client, for example: "MDA API Client".
-
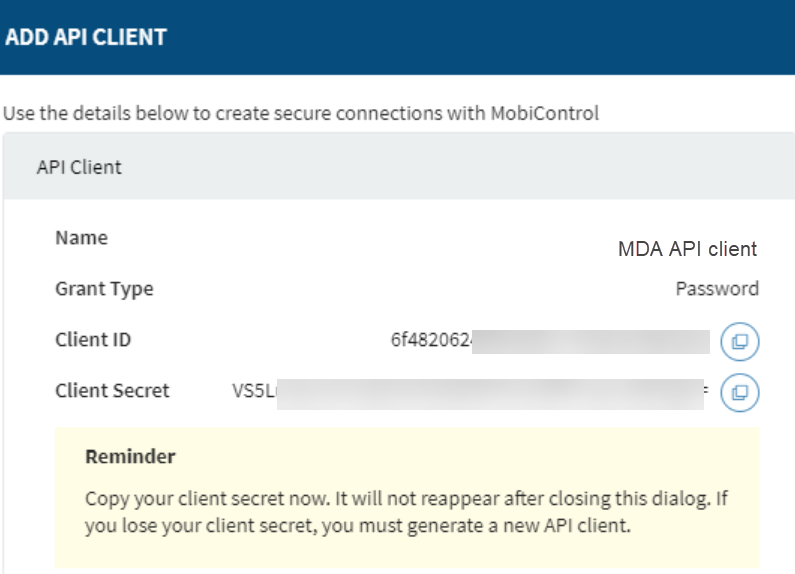
Click Generate.
The Client ID and Client Secret are automatically generated by the system.
-
Leave this window open. Do not close it until you use the provided information in Step 2: Configure the API Integration in the MDA Console.
-
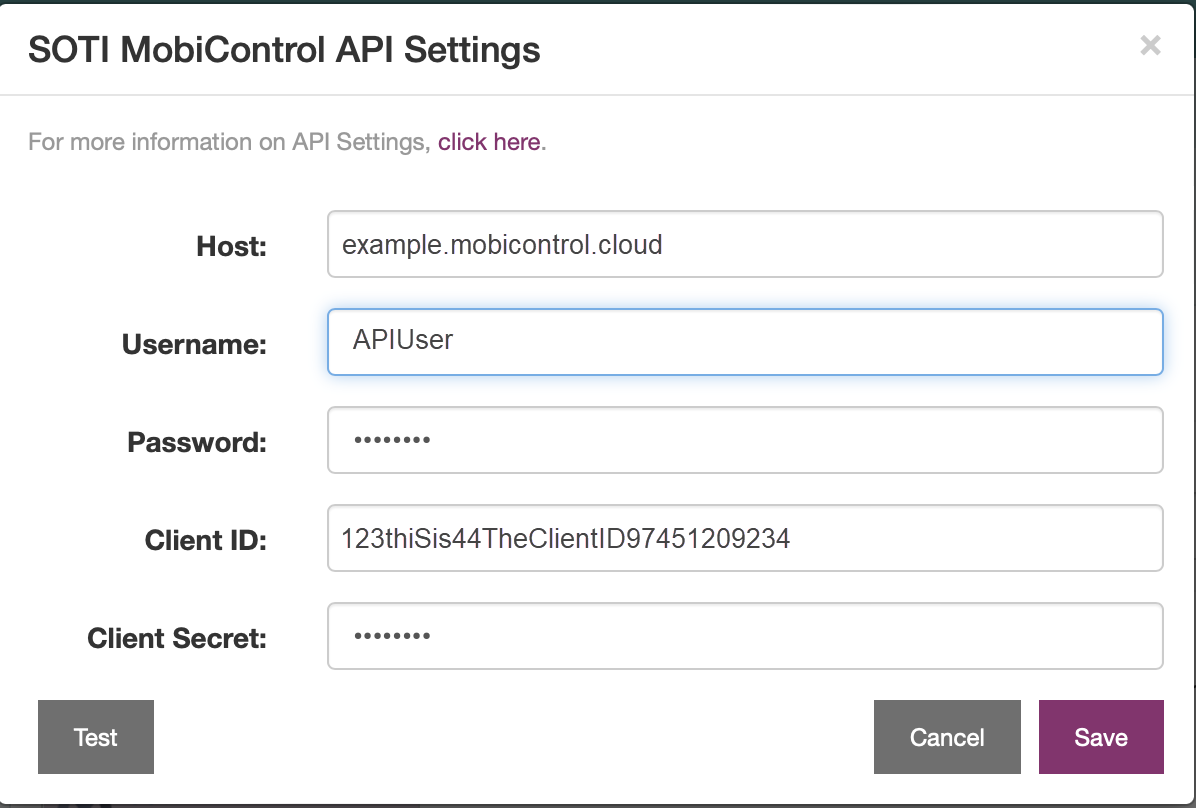
Take note of the remaining information required to complete the API Integration dialog in MDA console:
-
Hostname: The URL used to access the SOTI MobiControl console. For example: example.mobicontrol.cloud.
-
Username: Create or use a dedicated administrative user with appropriate administrative permissions for API operations.
-
Password: The password assigned to the administrative user.
-
Step 2: Configure the API Integration in the MDA Console
-
In the MDA console, go to Admin > MDMs tab.
-
To access the MDM system page, click one of the MDM options: Workspace ONE, Intune, or SOTI MobiControl.
-
In the API Integration section, switch the setting to ON. Click Configure.
In the configuration dialog, add API settings that you obtained from your MDM's admin console.
-
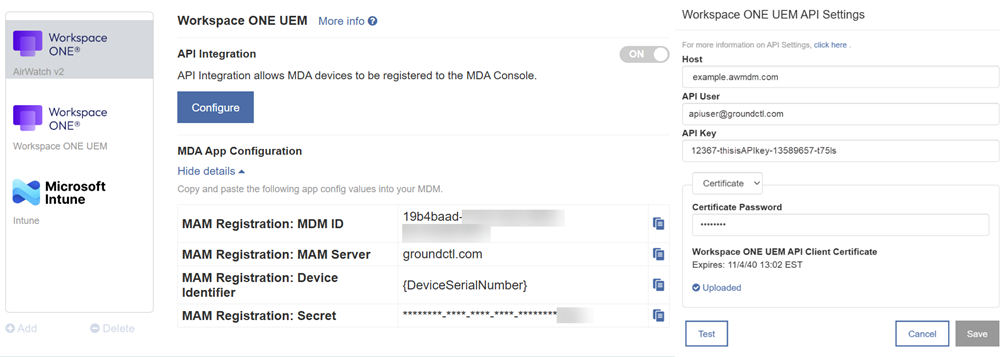
In the MDA App Configuration section, click Show details.
-
Copy the four AppConfig values from the MDA App Configuration section using the clipboard icon next to each item.
-
MAM Registration: MDM ID
-
MAM Registration: MAM Server
-
MAM Registration: Device Identifier
-
MAM Registration: Secret
NOTE:The Device Identifier AppConfig value may be formatted differently, depending on your MDM.
You will use these values when configuring AppConfig values in your MDM in the next task.
Omnissa Workspace ONE Example
Click to enlarge
-
Step 3: Configure AppConfig Settings in the MDM
Use the AppConfig values from the Mobile Access Console in your MDM system.
Microsoft Intune
-
In the Microsoft Intune admin console, go to Client Apps > App Configuration Policies > + Add.
-
Enter a policy name.
-
Set Device Enrollment Type to Managed Devices.
-
Set Platform to Android.
-
Select the app to configure from the Associated app.
-
Click Configuration settings and select Use configuration designer from the Configuration settings format drop-down list.
-
Add four new keys for the AppConfig and paste the values you copied from the MDM tab in the MDA console
-
Mobile Access Management MDM ID
-
Mobile Access Management Server
-
Device Identifier
-
Secret
-
-
Click OK at the bottom of the tab, then Add to finish.
Omnissa Workspace ONE
-
In the Workspace ONE UEM console, specify the user groups that will receive the Imprivata MDA app, if you have not already done so.
-
On the distribution screen, name the assignment and in the Assignment Groups field, enter the name of the user group or smart group.
-
Configure how to deploy Imprivata MDA. Select Auto.
-
-
From the menu on the left, click Application Configuration.
-
Add four new keys for the AppConfig and paste the values you copied from the MDM tab in the MDA console:
-
Mobile Access Management MDM ID
-
Mobile Access Management Server
-
Device Identifier
-
Secret
-
-
Save the change, then click Save and Publish, then Publish.
SOTI MobiControl
Step 1: Create an App Policy for Imprivata MDA
-
In the SOTI console, go to Policies > Apps and click New App Policy.
-
In the Create App Policy dialog, select Android > Android Enterprise.
-
On the General tab, type a name in the App Policy Name box.
-
On the Apps tab, click + to add apps to the policy.
-
On the Select Apps page, in the Apps section, select the Google Managed Enterprise account you added.
-
Click Managed Google Play.
-
Add the Imprivata MDA app from the Managed Google Play Store.
-
Add any other apps, as needed.
-
Step 2: Create a Device Group
Create a device group for the Imprivata MDA devices, if you have not already done so.
-
In the SOTI console, go to Devices and click New Group.
-
Select New Root Group.
-
In the Create Group dialog, type a group name. Click Create.
-
Grant the device group permissions: Manage Devices > View Devices to the dedicated administrator account for API authentication.
Step 3: Configure the Imprivata MDA App
-
In the SOTI console, click the gear icon for the Imprivata MDA app.
-
Click the Enable Managed App Config toggle.
-
Enter AppConfig values from the MDA admin console:
-
Add four new keys for the AppConfig and paste the values you copied from the MDM tab in the console
-
Mobile Access Management MDM ID
-
Mobile Access Management Server
-
Device Identifier
-
Secret
-
-
-
Click Save.


