Epic Delivered via Roaming VDI to ProveID Embedded Thin Clients
This configuration can be used in most clinical settings:
-
A shared workstation with a roaming virtual desktop lets users move from workstation to workstation and automatically connect to a full Windows desktop that is delivered via VDI.
-
As users authenticate to different shared workstations, they reconnect to their desktop virtualization session, which makes it appear as if the their desktop – and all applications that are running within it – are "roaming" with them.
This configuration is not recommended for settings where patient medical records must remain persistent on the workstation for different users to access. For example — an exam room.
This topic details how each component in the following environment is configured.
Click to enlarge
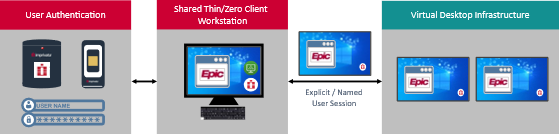
In this workflow:
-
The Epic EHR (Epic) is delivered to a shared Imprivata ProveID Embedded endpoint (thin client) via an Omnissa Horizon or Citrix DaaS VDI image (virtual desktop).
-
The Epic thick client is installed locally on the virtual desktop.
-
The virtual desktop is automatically launched after the user successfully authenticates.
For a summary of this architecture and Imprivata license requirements, see Epic EHR Delivered via VDI to Thin Clients.
Before You Begin
Review the following before you begin:
-
Verify that your thin clients are supported. For more information, see "ProveID Embedded" in the Supported Components guide.
-
The following steps assume that ProveID Embedded has been installed and configured.
For more information, see "Configuring ProveID Embedded on Linux Thin Clients" in the Imprivata Enterprise Access Management Online Help.
Imprivata Enterprise Access Management Configuration
In this section you configure the Imprivata user and computers policies:
-
An Imprivata user policy is the means by which you define authentication methods and rules to a specific group of users.
-
An Imprivata computer policy is the means by which you define security parameters to a specific set of workstations. This workflow requires two computer policies
-
The first policy is assigned to the shared thin clients.
-
The second policy is assigned to the virtual desktops.
-
The following steps detail the required settings to achieve this workflow. For complete details on user and computer policies, see the Imprivata Enterprise Access Management Help.
To enable the thin clients:
-
In the Imprivata Admin Console. open the gear icon menu, and click ProveID.
-
Select Allow full API access via ProveID Web API and ProveID Embedded.
-
Select your thin client model, and then click Save.
In this workflow:
-
Users are enabled to authenticate with a proximity card + a password.
-
Virtual desktop access is enabled.
Although users will typically authenticate to Imprivata Enterprise Access Management with a proximity card, enabling password as the second factor is required for Citrix/Omnissa Horizon pass–through authentication.
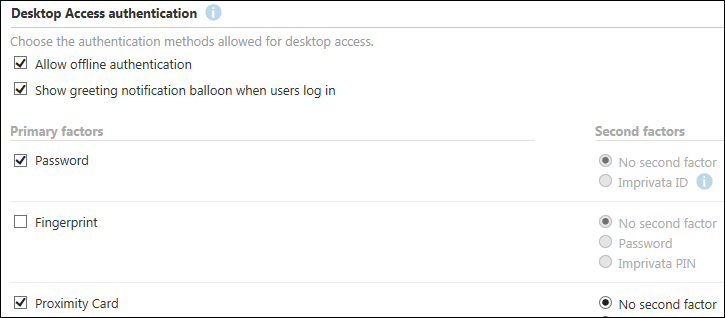
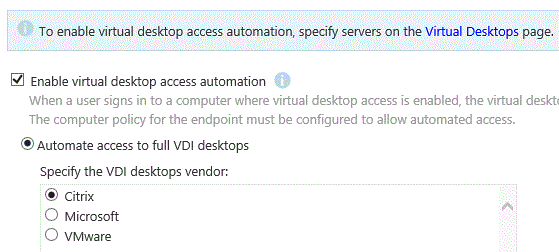
Defining Authentication Methods and Enabling Virtual Desktop Access
To create the user policy:
-
In the Imprivata Admin Console, click Users > User policies.
-
Click Add, and enter a policy name.
-
On the Authentication tab, go to the Desktop Access Authentication section.
-
Under Primary Factors, select Password, and then Proximity Card.
A secondary factor is not required.
-
On the Virtual Desktops tab, select Enable virtual desktop access automation.
-
Select Automate access to full VDI desktops, and then select either Citrix or VMware.
-
Save the user policy.
The following screen captures detail the above settings.
Click to enlarge .
Assigning the User Policy
To apply users to the policy:
-
In the Imprivata Admin Console, click Users > Users.
-
Do one of the following:
-
Manually select users, and then click Apply Policy.
-
Click Bulk Actions > Assign User Policies to download a sample CSV file.
-
-
Modify this file to map multiple users to the policy, and then import port it.
Configuring a connection to the VDI connection brokers makes your virtual desktops available to computer policies.
Configuring the Connection to Brokers
To configure the connection:
-
In the Imprivata Admin Console, click Computers > Virtual desktops.
-
Do one of the following:
-
Citrix — In the Citrix XenDesktop section, enter one or more URLs to the Citrix stores.
-
VMware — In the VMWare Horizon section, enter one or more URLs to the Horizon Connection Servers.
-
-
Click Save.
Configuring Citrix for Native Connections to Stores
Additional Citrix configuration is required to support native connections to Citrix StoreFront stores. The Citrix store must be configured with the following authentication methods to support Imprivata Enterprise Access Management SSO:
-
User name and password
-
Domain pass-through
-
HTTP basic — Even if the store is configured for HTTPS, this authentication method is required.
To configure the required authentication methods:
-
Open Citrix Studio.
-
Go to Citrix StoreFront > Receiver for Web.
-
Select the store you want to manage.
-
In the Store Web Receiver pane, click Choose Authentication Methods.
-
Click Add/Remove Methods and enable the required methods.
In this workflow, the thin clients are enabled for Windows authentication and automated virtual desktop access.
Enabling Windows Authentication and Virtual Desktop Access
To create the computer policy:
-
In the Imprivata Admin Console, click Computers > Computer policies.
-
On the Computer policies page, click Add, and then enter a name for the computer policy.
-
On the Shared Workstation tab, go to the Windows Authentication section, and select Authenticate using Windows.
-
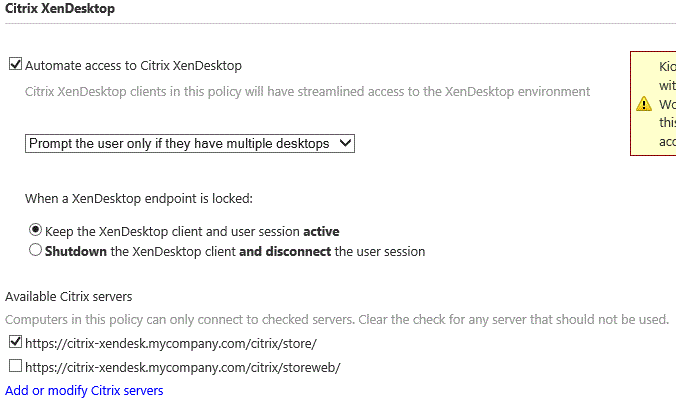
On the Virtual Desktops tab, enable virtual desktop access based on your vendor:
 Citrix settings
-
Go to the Citrix XenDesktop section, and select Automate access to Citrix XenDesktop.
-
Under When a XenDesktop endpoint is locked, specify the required behavior when the thin client becomes locked:
-
Keep the XenDesktop client and user session active
This option preserves the user session; when a user logs back into this endpoint computer (or another endpoint computer with XenDesktop enabled) their desktop and applications are preserved just as they were when this endpoint computer was locked.
-
Shutdown the XenDesktop client and disconnect the user session
This option helps optimize resource consumption and minimizes the total number of active sessions in use in the enterprise. When a user logs back into this endpoint computer (or another endpoint computer with XenDesktop enabled) their desktop will relaunch.
-
- Under Available Citrix servers, select one or more Citrix stores.
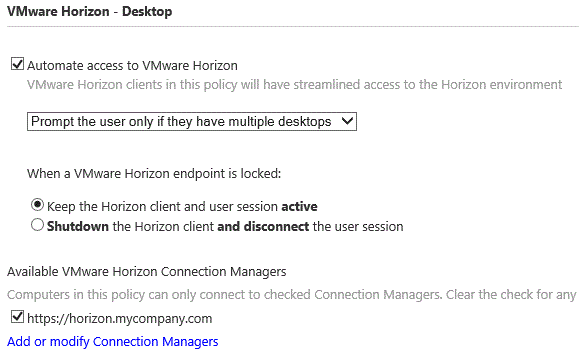
VMware settings
-
Go to the VMware Horizon – Desktop section, and select Automate access to VMware Horizon.
-
Under When a VMware Horizon endpoint is locked, specify the required behavior when the thin client becomes locked:
-
Keep the VMware Horizon client and user session active
This option preserves the user session; when a user logs back into this endpoint computer (or another endpoint computer with XenDesktop enabled) their desktop and applications are preserved just as they were when this endpoint computer was locked.
-
Shutdown the VMware Horizon client and disconnect the user session
This option helps optimize resource consumption and minimizes the total number of active sessions in use in the enterprise. When a user logs back into this endpoint computer (or another endpoint computer with XenDesktop enabled) their desktop will relaunch.
-
-
Available VMware Horizon Connection Managers, select one or more Horizon Connection Servers.
-
-
Save the computer policy.
The following screen captures detail the above settings:
Click to enlarge.

While there are no required computer policy settings for the virtual desktop, it is best practice to keep policies associated with your virtual desktops and thin clients separate.
For any settings you require, create a new computer policy and explicitly assign it to your virtual desktops.
Virtual Desktop Configuration
In this section, you:
-
Install the Imprivata agent on the virtual desktops on which Epic is locally installed.
Installing the Imprivata agent enables Imprivata to communicate between the virtual environment and the shared workstations.
-
Install the Imprivata Connector for Epic Hyperdrive.
Installing the Imprivata Connector for Epic Hyperdrive enables access to Epic Hyperdrive.
-
Configure registry settings.
Session persistence (roaming) is managed by your virtual environment, not Imprivata Enterprise Access Management. If your virtual environment is configured correctly for session persistence, Enterprise Access Management seamlessly roams user sessions, on authentication, to the endpoint computers in your environment.
Limit the delivery of an application to one instance per user. If the application is distributed across multiple servers in the farm, limiting the instance ensures that the connection broker roams the session that the user was previously using.
For more information about configuring session persistence and application delivery, see your vendor documentation.
The Imprivata agent is client–side software that is responsible for securing desktop login, authenticating users, providing SSO functions, securely storing application credentials, keeping an audit trail, and exchanging data with the appliance.
Using the Installation Wizard
To install the Imprivata agent:
-
In the Admin Console, click Computers > Deploy agents.
-
Download the agent installer from the Deployment Procedure section.
-
Run the installation wizard.
Completing the installation requires you to:
-
Enter the FQDN or IP address of the Imprivata appliance to which it should connect to obtain the enterprise topology.
-
Select the Single User Computer agent.
Beginning with 25.2, launching the Imprivata agent installer directly requires you to execute the MSI from an elevated command prompt. You cannot directly run the installer by either double-clicking the MSI or right-clicking the MSI and running it as an administrator.
Using a Software Distribution Tool
To deploy the Imprivata agent using third–party software distribution tool:
-
In the Imprivata Admin Console, click Computers > Deploy agents.
-
Download the agent installer from the Deployment Procedure section.
-
Deploy and run the Imprivata agent installation using the following syntax:
msiexec.exe /i "<path_to_installer>\ImprivataAgent.msi
IPTXPRIMSERVER="https://<appliance_FQDN>/sso/servlet/messagerouter"
AGENTTYPE=
The IPTXPRIMSEVER value specifies the appliance to which the Imprivata agent should connect to obtain the enterprise topology.
Consider the following:
-
This syntax represents the required installation parameters. For a complete list of supported parameters, see the Imprivata Enterprise Access Management Help.
-
The Imprivata agent installer supports standard msiexec options. For more information on these commands, run msiexec /?.
Install the Imprivata Connector for Epic Hyperdrive on all of the virtual desktop images that are delivering Epic. Consider the following:
-
The same Imprivata Connector for Epic Hyperdrive installer supports both 32-bit and 64-bit operating systems.
-
The Imprivata Connector for Epic Hyperdrive can only be used with one version of Epic on a given workstation.
NOTE: Before installing the Imprivata Connector for Epic Hyperdrive, be sure that Epic is installed.
Using the Installation Wizard
To install:
-
Run the installer (ImprivataConnectorforEpicHyperspace.msi).
The installer automatically detects the version of Hyperspace installed and installs the appropriate Imprivata Connector for Epic Hyperdrive files for that version. If multiple versions of Hyperspace are detected or if Hyperspace is not installed, the Imprivata Connector for Epic Hyperdrive installer prompts you to select one version of Epic.
-
Restart the server.
The Imprivata Connector for Epic Hyperdrive is automatically installed in the same directory in which the Imprivata agent is installed. The default directory is:
C:\Program Files (x86)\Imprivata\OneSign Agent\EpicConnector
Using the Command Line
To install:
-
Standard msiexec commands can be used to run the installer (ImprivataConnectorforEpicHyperspace.msi).
The Epic version of the Imprivata Connector for Epic Hyperdrive can be specified in the msiexec command line as follows:
-
EPICVERSION = 2014
-
EPICVERSION = 2015
-
EPICVERSION = 2017
-
EPICVERSION = "2018 August"
-
EPICVERSION = "2018 November"
-
EPICVERSION = "2019 February"
NOTE: If you are using the Imprivata Connector for Epic Hyperdrive version 6.3 or later, including an Epic version is not required.
-
- Restart the server.
The Imprivata Connector for Epic Hyperdrive is automatically installed in the same directory in which the Imprivata agent is installed. The default directory is:
C:\Program Files (x86)\Imprivata\OneSign Agent\EpicConnector
Thin Client Configuration
In this section, you:
-
Configure Citrix Workspace app or the Omnissa Horizon client to connect to and deliver the desktop.
-
Import the Citrix or VMware SSL certificate into your thin clients to establish trust between both environments.
In addition to the registry settings that are configured on the virtual desktop, USB redirection is managed from the thin client, independent of Imprivata Enterprise Access Management. Configure devices to support the USB redirection of your proximity card readers, as well as any other required devices.
Thin clients typically ship with a compatible version of Citrix Workspace app or the Omnissa Horizon client, which use the explicit user credentials to connect to and deliver the desktop.
Imprivata supports a number of thin client devices, all of which support native connections to Citrix DaaS and Omnissa Horizon Desktops.
While the exact steps to configure the connection vary by device, you will need the following:
- The virtual desktop connection settings:
The hostname or URL of the Omnissa Horizon server (desktop).
The Storefront Web Site or XenApp Services URL of the Citrix server (desktop).
-
The name of the desktop.
For more information on configuring the connection, see your vendor–specific documentation.
Import the Citrix or Omnissa Horizon SSL certificate into your thin clients to establish trust between both environments.
Before you begin, save a copy of the SSL certificate to a USB storage device (thumb drive).
The following material is included as a reference for tasks in the HP Device Manager (HPDM) console. For more information, see your HP documentation.
To import the SSL certificate to one thin client:
-
Insert the thumb drive into the thin client.
-
Click the wrench icon > Advanced > Certificate to open the Certificate Manager.
-
Go to the Local Root Certificate Authorities tab.
-
Click Import from File, locate the SSL certificate on the thumb drive, and click Open.
Restarting the thin client is not required.
To create the task:
-
In the HP Device Manager console, click Templates and Rules.
The Templates section lists all of the available base templates.
-
Double-click _File and Registry to open the Template Editor.
-
On the Content tab, click Add, select Deploy Files, and then click OK.
-
Click Add from local, and import the SSL certificate.
-
In the Path on Device field, enter /usr/local/share/ca-certificates, and then click OK.
-
On the Content tab, click Add, select Command, and then click OK.
-
In the Command field, enter the following:
cd /usr/lib/hptc-cert-mgr -
Click Add, and in the Command field, enter the following:
/usr/lib/hptc-cert-mgr/certmgr-apply
Do not change the default settings for Execute After Reboot (No) and Wait (Yes) for either command.
-
Click Save as to save the task, name the task, and then click OK
The Package Description Editor appears.
To edit the package description:
-
Complete the following fields:
-
Title
-
Installation Space
-
Architecture
-
OS Type
-
Device Models
-
- Click Generate.
The template is created and appears in the Templates section.
To send the task:
-
In the HP Device Manager Console, click Manage Devices.
-
Go to the Devices section, and right-click the required group of thin clients to open the Template Chooser.
-
From the Category List, select File and Registry, and then select the template that will deploy the SSL certificate.
-
Click Next.
-
Use the Task Editor to manage how and when the certificates will be sent to the device, and click OK.
The following material is included as a reference for tasks in the IGEL UMS. For more information, see your IGEL documentation.
To import the SSL certificate to one thin client:
-
Open a terminal window.
-
Change to the /wfs directory
-
Enter the following command to create a new subdirectory.
mkdir ca-certs -
Insert the thumb drive into the thin client, and navigate to the location of the SSL certificate.
-
Copy the SSL certificate file with the following command:
cp <cert_name>.cer /wfs/ca-certs
-
Restart the thin client.
To distribute the SSL certificate using the IGEL UMS:
-
From the UMS console, right-click Files, and then click New File.
-
Select Upload Local File to UMS server, and then use Local file to browse to the SSL certificate.
-
In the field Local File, enter the location of the SSL certificate file.
-
Under File Target:
-
Set Classification to Undefined.
-
In the Device files location field, enter the following path:
/wfs/ca-certs/<cert_name>.cer
-
-
Click OK.
-
Assign the SSL certificate to your thin clients directly or through the profile that is managing them.
-
Restart the thin clients.
NOTE: For more information on assigning objects, see the IGEL Knowledge Base.
Epic Configuration
In this section, you configure the Imprivata Connector for Epic Hyperdrive.
Imprivata has worked with Epic Systems to develop the Imprivata Connector for Epic Hyperdrive. The Connector leverages Epic's authentication API to provide single sign-on, single sign-off, and fast user switching for Epic Hyperdrive.
Imprivata Enterprise Access Management offers two different configuration options for Epic that can be enabled on a per-workstation basis:
-
SSO for Epic only workflow
With this workflow, the Windows desktop is always unlocked. Users authenticate to Epic using their fingerprint or proximity card. This workflow is optimized for workstations on which Epic is the most frequently accessed application.
-
SSO for multiple applications including Epic
With this workflow, the Windows desktop is secured by the Imprivata agent. Users authenticate to EAM using their fingerprint or proximity card. This workflow is optimized for workstations on which Imprivata Single Sign-On is required for multiple applications, including Epic.
EAM can be configured to secure Epic and maintain the patient context or log the user out of Epic with either of these workflows.
In scenarios where EAM performs Fast User Switching into the Epic EMR Hyperdrive client delivered via Citrix, we recommend that the Epic session remain active during times of clinician usage. The utilization of Citrix timeout settings for Epic sessions, or any closure of the Epic session, may impact login times for clinical users because they must wait for the Epic session to reconnect.
Citrix and VDI connection times are unaffected by EAM. When needed, EAM automates the connection to Citrix, but does not reduce the connection time.
When configuring support for Epic, consider the following:
-
Use the endpoint computer policy to manage the settings on the Connector for Epic tab.
These settings are only honored from the workstation on which users access Epic. The settings are not honored where Epic is installed.
-
The Imprivata Connector for Epic Hyperdrive for Epic supports a number of reference architectures.
While you can use the Imprivata Connector for Epic Hyperdrive Configuration Guide to complete the steps required of this reference architecture, the guide does include information that is optional.
As such, the table below provides an overview of what must be configured for this specific reference architecture.
| Configuration | Notes |
|---|---|
| System definitions |
Epic system definitions are configured to support roaming. For assistance configuring your system definitions, contact Epic. |
| Authentication devices |
Ensure that your authentication devices are configured correctly:
For more information, see Chapter 4. |
| Epic only mode |
In this configuration, Epic is the only application that clinicians can access from the shared workstation:
For more information, see Chapter 9. |
| Multi–app mode |
In this configuration, clinicians can access other applications in addition to Epic:
For more information, see Chapter 8. |