 minute read
Configure Epic Rover
Configure the integration between Imprivata MDA and the Epic Rover app. Epic is a registered trademark of Epic Systems Corporation.
This topic covers the configuration of the following features. The features can be configured separately and are not dependent on one another.
Configure Mobile Access-Cloud Based Logout from Epic
Supported in Imprivata MDA 8.2 and later, using the Mobile Access Cloud.
This feature disassociates a user from a device in Epic and prevents push notifications (messages, alerts, or calls) from being sent to the device after the user is logged out.
This feature should be used together with the Epic Rover app force stop logout action.
Epic only allows connection to a single Mobile Access Cloud environment per Epic environment type (non-prod vs. prod).
Customers with a single Mobile Access Cloud environment can configure both non-production and production Epic environments in the Epic API Logout section of the Admin page.
Configure non-production first, then production.
Supported Epic Apps
This feature is compatible with Epic Rover, Epic Haiku, and Epic Canto apps and should be used together with a force quit logout action.
Epic Documentation
For more information, see the Epic Galaxy documentation:
Interconnect User Case Guide – Disassociate a Mobile Device.
Epic Requirements
-
The Epic environment (Interconnect Server) must be reachable from the Mobile Access server and have a valid TLS certificate.
-
Minimum Epic version. The integration requires Epic November 2023 release and later.
-
Create and Associate a New Background User. Steps apply to Epic February 2024 and later.
-
In Epic, create a new background user for the Interconnect OAuth2 back-end service-no specific security points or classes are required.
-
Associate the new background user with the Interconnect OAuth2 back-end service:
-
On the Interconnect Administrator's menu in text, select OAuth2 Management, then Environment-Specific Client Settings.
-
Select Create/Edit Settings and enter
Imprivata Mobile Access Connectorin the Client field. -
Specify the background user that you created in the Background user field.
-
-
Specify the background user that you created in the Associated User column.
-
-
Epic licensing. This feature utilizes the DisassociateMobileDevice Epic API, which is often included in customers' existing Epic licensing. Customers are encouraged to check with their Epic representative to confirm.
MDA Console Requirements
-
MDM App Configuration. This feature requires configuring bindings and API integrations between your MDM, the Mobile Access server, the Imprivata MDA app and Epic Rover.
-
Register the Imprivata MDA app with the Mobile Access Server.
-
Assign the Epic Rover app's AppConfig keys.
-
 Step 1: Register the Imprivata MDA App
Configure the Imprivata MDA app to communicate with the Mobile Access cloud and your MDM system. When the MDM deploys the MDA app to the devices, MDA passes several bits of information back to the Mobile Access server to correctly identify the MDM.
The Mobile Access server must exchange some information with your MDM. The steps in this section assume that you have the MDM admin console and the Mobile Access console open at the same time.
-
In the MDA console, go to Admin > MDMs. Click + and select your MDM from the list (Microsoft Intune, Omnissa Workspace ONE, or SOTI).
-
In the API Integration section, switch the setting to ON. Click Configure.
-
In the configuration dialog, add API settings that you obtain from your MDM's admin console.
For more information on configuring your MDM's API access, see Register the MDA App with the MDA Console.
-
In the MDA App Configuration section, click Show details.
-
Copy the four AppConfig values from the Android Locker App Configuration section using the copy to clipboard icon next to each item. You will use these values when configuring AppConfig values in your MDM's admin console.
-
Copy the four AppConfig values from the MDA App Configuration section using the copy to clipboard icon next to each item.
-
MAM Registration: MDM ID
-
MAM Registration: MAM Server
-
MAM Registration: Device Identifier
-
MAM Registration: Secret
NOTE:The Device Identifier AppConfig value may be formatted differently, depending on your MDM.
You will use these values when configuring AppConfig values in your MDM in the next task.
-
-
Microsoft Intune
-
In the Microsoft Intune admin console, select the Imprivata MDA app to configure from the Associated app list.
-
Click Configuration settings and select Use configuration designer from the Configuration settings format list.
-
Add four new keys for the AppConfig and paste the values you copied from the Mobile Access MDM tab:
-
Mobile Access Management MDM ID
-
Mobile Access Management Server
-
Device Identifier
-
Secret
-
-
Click OK at the bottom of the tab, then Add to finish.
Omnissa Workspace ONE
-
In the Workspace ONE UEM console, specify the user groups that will receive the Imprivata MDA app.
-
On the distribution screen, name the assignment and in the Assignment Groups field, enter the name of the user group or smart group.
-
Configure how to deploy Imprivata MDA. Select Auto.
-
-
From the menu on the left, click Application Configuration.
-
Add four new keys for the AppConfig and paste the values you copied from the Mobile Access MDM tab:
-
Mobile Access Management MDM ID
-
Mobile Access Management Server
-
Device Identifier
-
Secret
-
-
Save the change, then click Save and Publish, then Publish.
SOTI MobiControl
-
In the SOTI console, click the gear icon for the Imprivata MDA app.
-
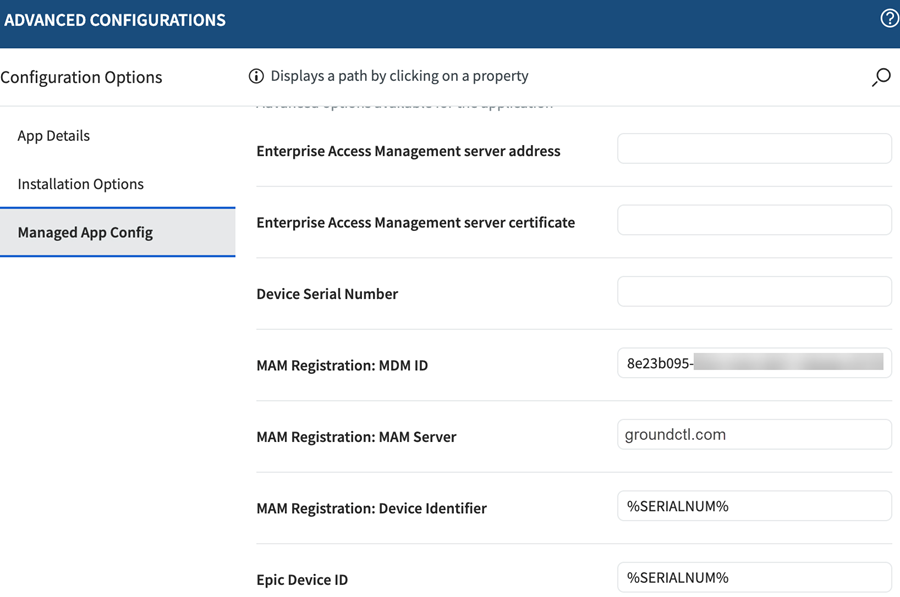
Click the Enable Managed App Config toggle.
-
Add four new keys for the AppConfig and paste the values you copied from the Mobile Access MDM tab:
-
Mobile Access Management MDM ID. This may be labeled as MAM Registration: MDM ID.
-
Mobile Access Management Server. This may be labeled as MAM Registration: MAM Server.
-
Device Identifier. This may be labeled as MAM Registration: Device Identifier.
Click to enlarge
-
Secret
-
-
Click Save.
Create a device group for the Imprivata MDA devices:
-
In the SOTI console, go to Devices and click New Group.
-
Select New Root Group.
-
In the Create Group dialog, type a group name. Click Create.
-
Grant the device group permissions: Manage Devices > View Devices to the dedicated administrator account for API authentication.
Step 2: Configure MDM AppConfig Settings for the Epic Rover App
In your MDM, for the Epic Rover app, configure the app and set the following AppConfig key/value pairs.
Depending on your MDM's interface, some AppConfig keys are displayed with specific UI labels.
| Configuration Key | Value Type | Configuration Value | Description |
|---|---|---|---|
| EpicMobileDeviceID | string |
|
Sets a unique MDM device ID for use with Epic API logout. IMPORTANT: The unique configuration value for EpicMobileDeviceID is based on how your MDM treats device serial numbers. |
| EpicMobileDeviceIDAppName | Boolean | true |
Enables the Epic App name to be appended to the unique install ID. This allows for different app installations running on the same device to be uniquely identified. |
| EpicMobileConfigurationURL | string | epicrover://handheld/config/XXXX |
The unique Epic configuration URL. To obtain the EpicMobileConfigurationURL for your environment, contact your Epic administrator. |
Microsoft Intune
-
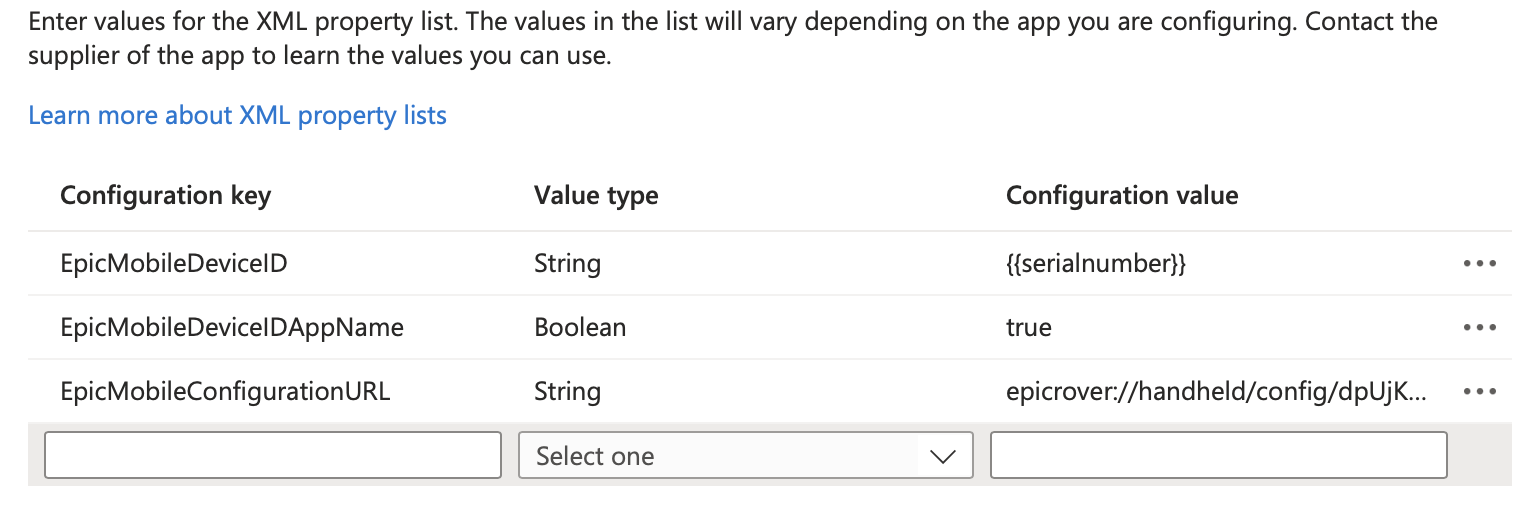
In the Microsoft Intune admin console, select the Epic app to configure from the Associated app.
-
Click Configuration settings and select Use configuration designer from the Configuration settings format list.
-
Add a new key for EpicMobileDeviceID AppConfig. Set the Value Type to String, and set the Configuration Value to {{serialnumber}}.
-
Add a new key for the EpicMobileDeviceIDAppName. Set the Value Type to Boolean and set the Configuration Value to true.
-
Add a new key for the EpicMobileConfigurationURL. Set the Value Type to String, and set the Configuration Value to your unique Epic configuration URL.
Click to enlarge
Omnissa Workspace ONE
-
In the Workspace ONE UEM console, specify the user groups that will receive the Epic app.
-
On the distribution screen, name the assignment and in the Assignment Groups field, enter the name of the user group or smart group.
-
-
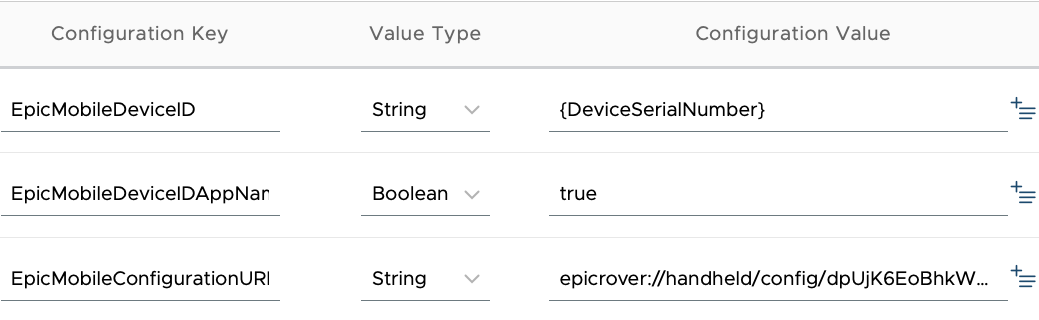
From the menu on the left, click Application Configuration.
-
Add a new key for EpicMobileDeviceID AppConfig. Set the Value Type to String, and set the Configuration Value to {DeviceSerialNumber}.
-
Add a new key for the EpicMobileDeviceIDAppName. Set the Value Type to Boolean and set the Configuration Value to true.
-
Add a new key for the EpicMobileConfigurationURL. Set the Value Type to String, and set the Configuration Value to your unique Epic configuration URL.
Click to enlarge
-
Save the change, then click Save and Publish, then Publish.
SOTI MobiControl
-
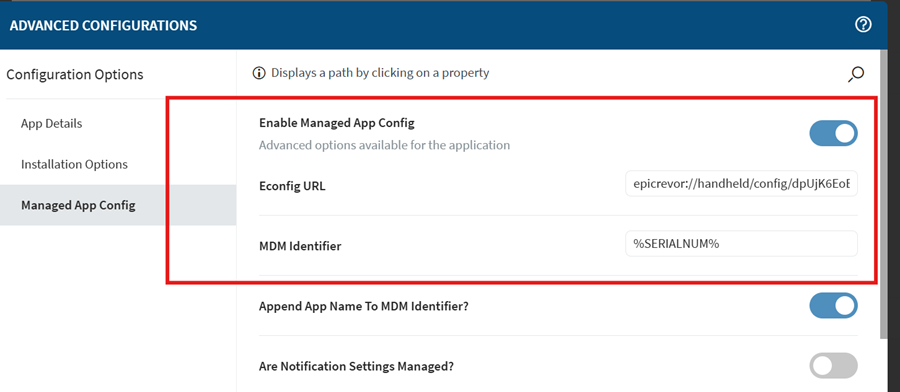
In the SOTI MobiControl console, click the gear icon for the Epic Rover app and click the Enable Managed App Config toggle.
-
Enter the AppConfig values for Epic Rover:
-
Econfig URL. Set the value to your unique Epic configuration URL.
-
MDM Identifier. Set the value to %SERIALNUM%.
Click to enlarge
-
Validate the Epic App's AppConfig
To validate the Epic app AppConfig has been applied:
-
Open the Epic app, tap the environment selector at the top of the login window, tap the Back button in the top left, then tap the Identifier button in the bottom left.
This should display the Install ID in a format of the device's serial number with the app name directly after.
For example, J4X7X22WGARover.
If the Install ID is still a long alphanumeric string, try reinstalling the app. The Install ID must match the device’s serial number with the app name appended, or the logout action will fail with the error “…Install ID not found.”
Step 3: Request the Mobile Access Connector
In the Epic Showroom, click Request Imprivata Mobile Access Connector to request access to the Imprivata Connector from the Imprivata Epic team.
When the request is complete, your Epic Showroom displays a status of Ready.
The Epic Showroom will show a status of Pending until Step 4 is completed.
Step 4: Configure Epic API Logout
To configure Epic API Logout for Epic Rover:
-
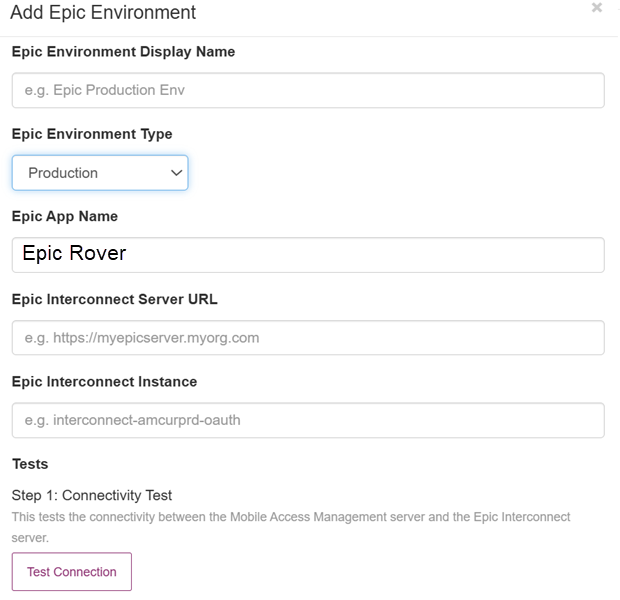
In the MDA console, go to Admin > Epic App Logout. Click Add Epic Environment.
-
In the Add Epic Environment dialog, supply the settings for your Epic environment:
-
In the Epic Environment Display Name, type a descriptive name.
-
In the Epic Environment Type, select Non-production first.
NOTE:You can create both Non-production and Production, but Epic requires Non-production to be completed first.
-
In the Epic App Name, type the Epic app name, for example: Rover.
Epic App Name name is case sensitive.
-
In the Epic Interconnect Server URL, type the URL of the Epic Interconnect Server.
-
In the Epic Interconnect Instance, type the instance name, for example: APIProxyPRD or APIProxyTST.
-
In the Tests section, click Test connection to test the connection between the Mobile Access Cloud and Epic Interconnect servers.
Authentication failures are expected until this task is complete.
-
Click Save to save the configuration.
The Mobile Access server generates a JWK URL.
-
Epic May 2026 and Later
Beginning with the May 2026 release of Epic, organizations can directly retrieve the automatically-generated Mobile Access WK URL for input into the Epic Interconnect Admin Utility.
If you are using an earlier release of Epic than May 2026, skip this section and see the section Earlier Epic Releases.
-
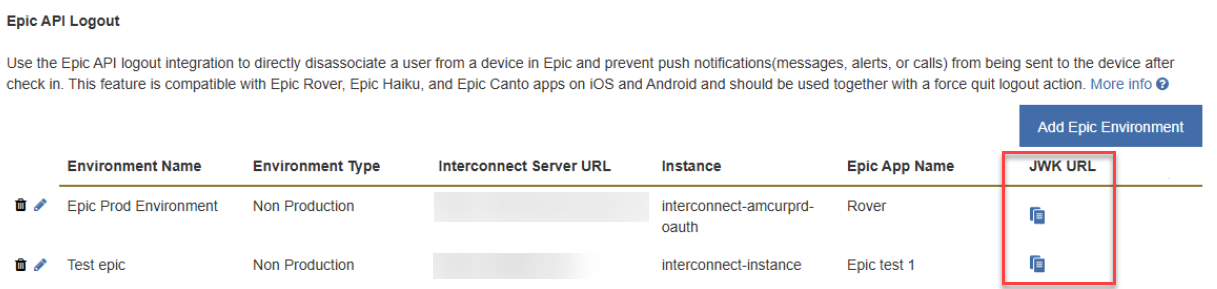
In the MDA console, go to Admin > App Logout.
In the Epic API Logout section, copy the JWK URL to your clipboard for your non-production and production environments.
Click to enlarge
-
In the Epic Interconnect Admin Utility, paste the JWK URLs into their respective settings for your non-production and production environments.
Earlier Epic Releases
For organizations using earlier Epic releases than May 2026, the process involves the Imprivata Epic team facilitating the upload of the JWK URL to Epic:
-
The Imprivata Epic team uploads the JWK URL generated by the Mobile Access server to Epic.
NOTE:It may take up to 12 hours to sync the JWK URL.
During this time, authentication to your Epic environment will not succeed.
The 12 hour wait time can be expedited by contacting your Epic TS.
Click to enlarge
The Mobile Access server now has access to communicate securely with your Epic environment.
Access to Epic Showroom is limited to your organization’s Epic administrators.
Step 5: Test the Epic Logout API
After the environments sync, perform a logout test. This tests the logout API call on a device.
-
In the Add Epic Environment dialog, in the Tests section, type a device serial number in the Device Serial Number box.
-
Click Test Epic API Logout.
If successful, the Epic app is immediately logged out and returns to its login screen.


