Upgrading Enterprise Access Management with MFA 24.1 to 25.4 on G4 Appliances
The following sections detail how to upgrade Imprivata G4 appliances from 24.1 to 25.4.
This topic applies to upgrading the fourth generation (G4) appliances.
Upgrade to the latest available HF of 24.1 before upgrading to 25.4.
When you apply hotfixes to appliances, always apply the same hotfix to all appliances in the enterprise. Imprivata does not support enterprises with appliances running different releases or hotfixes.
Known Issues and Upgrade Considerations
Review the following before you upgrade:
-
A known issue that is listed here represents something that can result in downtime during or after the upgrade to 25.4.
-
An upgrade consideration that is listed here represents a change in either product behavior or configuration from the 24.1 enterprise to 25.4.
Known Issues
There are no known issues that affect this upgrade.
Upgrade Considerations
The following considerations apply to this upgrade:
Each stage of the upgrade of your Imprivata appliances from 24.1 to 25.4 will take a certain amount of time, depending on the size of the update needed.
Consider the following time estimates:
-
Appliance operating system updates - typically takes 20 to 40 minutes.
-
Database updates - typically takes 45 to 120 minutes, or possibly longer, based on the size of the database.
The Imprivata Appliance Console will not be reachable during the database update process.
This consideration applies if:
-
You plan to enable Face recognition as an authentication method.
-
Your enterprise is comprised of mixed endpoint types (thin clients, medical devices, etc).
What to Expect
Face recognition is supported on Windows single-user and shared workstations only.
Imprivata has identified limited cases where Imprivata agents running on non-Windows platforms are unable to authenticate depending on user policy configuration.
Next Steps
After enabling Face recognition, it is recommended that you test and validate workflows on a subset of your non-Windows endpoints.
-
If you encounter issues, disable multiple second authentication factors associated with these endpoints using computer policy overrides, and contact your vendor and Imprivata representative.
-
Limiting the number of second authentication factor options using computer policy overrides is recommended to resolve issues that you might encounter.
Beginning with 25.2, you can no longer directly run the Imprivata agent installer. This includes:
-
Double-clicking the MSI.
-
Right-clicking the MSI and running as an administrator.
What to Expect
Launching the installer directly requires you to execute the MSI from an elevated command prompt. Consider the following:
-
This requirement does not affect deployments performed through Microsoft Endpoint Configuration Manager (SCCM) or any other third-party software deployment tool.
-
Directly running the MSI results in an error message stating that you do not have the required permissions.
This behavior occurs even if you are logged into the Windows endpoint with administrator credentials.
Next Steps
No action required.
This consideration applies to your deployment if you are using any of the following HID Omnikey reader models:
-
4121
-
5121
-
5321
-
5125
-
5325
-
6321
HID has designated these models EOL in 2016 and 2017.
What to Expect
While an HID driver (hid_global_xchip_driver_ru_1.2.27.145.zip) is required to use the above reader models with the Imprivata Windows agent, the driver is not compatible with and prevents the use of the Windows Core Isolation security feature.
Beginning with 25.2:
-
Upgrading the Imprivata Windows agent automatically removes this driver.
-
The Imprivata Windows agent no longer packages this driver for new installations.
Next Steps
Next steps depend on if Core Isolation and Memory integrity is enabled on your Windows endpoints.
| Core Isolation and Memory integrity enabled? | Next steps |
|---|---|
| Yes |
|
| No |
|
Beginning with Enterprise Access Management with
What to Expect
The Imprivata appliance no longer ships with a 32-bit version of the Imprivata agent.
Next Steps
No action is required. Consider the following:
-
The Imprivata appliance remains backwards compatible with the 32-bit Imprivata agent. Features released in 24.3 and earlier continue to be supported by the 32-bit Imprivata agent.
NOTE:To take advantage of features released in 25.1 and later, the 64-bit version of the Imprivata agent is required.
-
Single sign-on for 32-bit applications remains supported.
You can continue to use the 64-bit version of the Imprivata agent to start the Imprivata Application Profile Generator (APG) and profile 32-bit applications for SSO.
Imprivata Enterprise Access Management with MFA 23.3 introduced number matching with Imprivata ID. When enabled, number matching requires users to enter a 2-digit code into Imprivata ID when authenticating for Imprivata Web SSO and Remote Access workflows.
Consider the following:
-
Even if you have not enabled this functionality in your 24.1 enterprise, it is enabled by default after an upgrade. This will affect how your users authenticate for existing Imprivata Web SSO and Remote Access workflows.
-
While the default behavior prioritizes security, you might choose to disable it depending on your organization's needs.
Changes to the Feature
Beginning with Imprivata Enterprise Access Management with MFA 25.1:
-
Number matching is automatically enabled in your Imprivata Enterprise Access Management with MFA workflow policy. The new default behavior applies to at least Imprivata Web SSO and cloud-based Remote Access workflows.
-
Previous to 25.1, number matching was disabled by default. In which case, users were required to approve an Imprivata ID push notification to authenticate.
-
Enabling number matching helps to provide a greater level of protection against MFA fatigue attacks that are generally associated with push notifications.
-
-
You have more control over how you deploy number matching. You can now scope number matching to the following types of workflows:
-
Imprivata Web SSO and cloud-based Remote Access
-
Legacy Remote Access
-
While enabling number matching prioritizes security, it does change the authentication experience. Users will be promoted to enter a 2-digit code into Imprivata ID to authenticate, instead of approving a push notification that they might be familiar with.
Changes to the Admin Console
An upgrade to 25.4 results in a change on the Workflow policy page (Users menu > Workflow policy page). This change gives you more control over how you can manage number matching:
-
Before upgrading, there is only one setting to configure number matching, and it is disabled by default.
When enabled, number matching is configured globally and applies to Imprivata Web SSO, cloud-based Remote Access, and legacy Remote Access workflows.
The following screen capture is an example of this setting.
Click to enlarge.

- After upgrading, two settings are available to you:
A setting to manage Imprivata Web SSO and cloud-based Remote Access workflows. This setting is always enabled by default.
A setting to manage legacy Remote Access workflows only. The state of this setting is depends on whether number matching is enabled in your 24.1 enterprise.
The following screen capture is an example of these settings.
Click to enlarge.

Number Matching Default Settings
The new number matching settings for Imprivata ID are available on the Workflow policy page (Users menu > Workflow policy page > MFA fatigue mitigation section).
-
Number matching for Imprivata Web SSO and cloud-based Remote access workflows is always enabled by default.
-
Number matching for legacy Remote Access workflows might be enabled. The state of this setting depends on whether number matching is enabled in your 24.1 enterprise.
The following table details how these settings are enabled after you upgrade:
| Number matching enabled before upgrading? | Expected behavior after an upgrade |
|---|---|
| Yes |
|
| No |
|
It is recommended that you review the default number matching for Imprivata ID settings after you upgrade. You can find the settings on the Workflow policy page (Users menu > Workflow policy page > MFA fatigue mitigation section). The new settings might affect how users authenticate for existing Imprivata Web SSO and Remote Access workflows.
The following screen capture is an example of these settings.
Click to enlarge.
The following table details the authentication experience when number matching is enabled or disabled:
| Workflow | Enabled? | Authentication experience |
|---|---|---|
|
Yes | Users are prompted to enter a 2-digit code into Imprivata ID to authenticate. |
| No | User are prompted to respond to an Imprivata ID push notification to authenticate. | |
| Legacy Remote Access | Yes |
Users are prompted to enter an Imprivata ID token code to authenticate. |
| No | User are prompted to respond to an Imprivata ID push notification to authenticate. |
Beginning with 25.1, Imprivata Self-Service Password Reset (SSPR) now requires access to the Imprivata ProveID Web API.
Enterprises currently licensed for Imprivata SSPR
Enterprises that are licensed for Imprivata SSPR are automatically enabled for Imprivata ProveID Web API access without requiring an Imprivata ProveID Web API license. This ensures that users have uninterrupted access to Imprivata SSPR after you complete the upgrade.
Access to the Imprivata ProveID Web API remains a licensed feature. Access is automatically enabled only in support of Imprivata SSPR. All other functionality that requires a license continues to do so.
Imprivata ProveID Web API settings and the Admin Console
Automatically enabling Imprivata ProveID Web API access in support of Imprivata SSPR does change existing behavior in the Admin Console:
-
Before upgrading, the settings to manage the scope of access are only visible if your enterprise is licensed for the Imprivata ProveID Web API.
-
After upgrading, these settings are enabled and configured if required. How your enterprise is licensed for Imprivata SSPR and the Imprivata ProveID Web API determines if access is configured as part of the upgrade.
You can find the following settings on the API Access page (gear icon menu > API Access page > ProveID - API access and security section):
| How the enterprise is licensed | Scope of access after upgrading |
|---|---|
|
The level of access is set to Do not allow any API access. |
|
The level of access is set to Allow restricted API access via ProveID Web and ProveID Embedded. |
|
The level of access remains unchanged. There is no change to the existing settings. |
|
There is no change to the existing settings, unless the existing level of access was set to Do no allow any API access. In which case the value is set to Allow restricted API access via ProveID Web and ProveID Embedded. |
No action is required.
Access to the Imprivata ProveID Web API remains a licensed feature. Access is automatically enabled only in support of Imprivata SSPR. All other functionality that requires a license continues to do so.
As part of Imprivata's continuing effort to increase our security posture, beginning with 24.2, Imprivata Self-Service Password Reset now requires that your endpoints trust the SSL certificate of the Imprivata appliance.
What to Expect
After upgrading, if your endpoints do not trust the SSL certificate of the Imprivata appliance, users see a certificate error and cannot reset their password.
Next Steps
-
If your endpoints already trust the SSL certificate, no action is required.
-
If your endpoints do not trust the SSL certificate, download and deploy it to the trusted certificate store.
To download the SSL certificate:
-
In the Imprivata Appliance Console, go to the Security page > SSL tab.
-
Click Download the certificate.
-
Before You Start the Upgrade
Familiarize yourself with the requirements, new features and enhancements, and other information associated with the release to which you are upgrading:
An upgrade from 24.1 to 25.4 requires that the installed version of the Imprivata G4 Platform Update (platform update) be applianceG4-2025-4-1 or later.
If this platform update is not Installed to all appliances, download and install it before upgrading G4 appliances.
Due to the file size of the platform update file, use one of the following methods for uploading:
-
Upload the platform update files from a file server connected to the appliance.
-
If you cannot use a file server, upload the IPM from your local computer, using the Imprivata Appliance Console > Packages tab.
An upgrade from 24.1 to 25.4 supports a zero–downtime upgrade. During a zero–downtime upgrade, you can upgrade every appliance in the enterprise at the same time:
-
The Imprivata server remains up throughout the entire upgrade.
-
The Imprivata quarterly platform update is applied manually by the administrator to one appliance at a time. If the administrator chooses to upgrade the Imprivata quarterly platform on all appliances at the same time, there will be downtime while the updates are running.
-
Appliances do not have to be rebooted after an upgrade.
-
Scheduled jobs are skipped until their next scheduled time. Skipped jobs include audit record maintenance, automated domain password changes, automated domain synchronization, and scheduled reports.
The upgrade requires at least 10 MBps of available bandwith. If your network has fewer than 10MBps available, then agent authentication failures or upgrade failure may occur.
Perform the upgrade during off-peak network utilization hours to provide as much bandwidth as possible for the upgrade.
Before you upgrade, review the Release Notes and the Supported Components, to familiarize yourself with:
-
New features, enhancements, and qualifications.
-
The supported configurations and endpoint types for your environment.
To download these documents, see the Imprivata Enterprise Access Management with MFA release documentation page.
Consider the following:
-
Audit records are retained during the upgrade.
-
As part of the appliance upgrade, the Imprivata database is synchronized. The enterprise remains online during the synchronization, which can result in infrequent data loss.
Although unlikely, data that is collected while the database is being synchronized may be lost. As a result, some users may be required to re–enter credentials that were captured during the upgrade. Examples of lost data include:
-
User credentials captured during user authentication
-
Passwords that are reset
-
Changes made through Imprivata's provisioning interface
This type of data loss may occur only when the Imprivata database is being synchronized as part of the upgrade. It does not occur when synchronizing the Imprivata database outside of the upgrade process.
Suspend provisioning to the Imprivata database during the Imprivata upgrade.
Download the Imprivata Package Manager Files
Before you begin the upgrade, download the Imprivata Package Manager (IPM) files.
The Imprivata G4 Platform Update (platform update) includes updates to third-party software, infrastructure, communication, and security improvements.
To determine if a platform update is required, and when to install each version, see "Imprivata Platform Update Requirements" above.
To download the required platform IPM:
Downloads:
The following item represents the minimum required platform IPM for upgrading from 24.1 to 25.4.
Platform updates are released on a regular basis, and a more recent platform IPM may be available on the product downloads page for the release to which you are upgrading.
applianceG4-IMPRIVATA-2025-4-1 - the virtual G4 appliance.
The G4 Imprivata Update IPM (Imprivata Update) includes the new business logic, features, enhancements, and bug fixes for the release.
When updating the Imprivata update IPM, all appliances in the enterprise must be at the same hotfix release.
To download the Imprivata update IPM:
-
From the product downloads page, select the Enterprise Access Management release to which you are upgrading.
-
Download the G4 Imprivata Update.
Prepare for the Upgrade
The following sections detail how to prepare for the upgrade.
Archive and Delete Audit Records
Archiving and deleting audit records reduces the time it takes to back up the Imprivata database and complete the upgrade.
Archiving audit records requires an FTP server, network share, or SCP server on which to store the records.
If you have not yet configured a file server, see "Configuring a File Server for Storing Audit Records and Reports" in the Imprivata Online Help.
Consider the following before you archive and delete audit records:
-
Limit the number of records on the appliance to 10 million or fewer to reduce the amount of time the Imprivata database backup takes.
-
Audit records for an entire enterprise are logged from a database appliance in the site. Record maintenance consumes bandwidth, so select a site that can accommodate the additional traffic or run the job during off-peak hours.
-
Administrator activity is not stored in audit logs and cannot be deleted.
-
Reports cannot be created from deleted data. When specifying the age of files to be deleted, consider the period of time for which you need reporting.
For more information on reporting using archived data, see "Running Reports on Archived Data" in the Imprivata Online Help.
To archive and delete audit records:
-
In the Imprivata Admin Console, go to the gear icon menu > Settings page.
-
Go to the Audit Records section.
-
Click Manage audit records, then select Show record counts for all time to identify how many audit records are being stored on the appliance.
-
Go to the Record Maintenance section, select Archive and Delete, and specify the minimum age of records to be archived.
NOTE:Although all audit records are archived, regulated audit records that must be retained for a specific period of time are not deleted from the appliance.
-
In Save location, enter the relative path of the location on the file server.
NOTE:If the path is blank for an SCP server, the archived records are saved to the home folder of the account. For example:
/home/<user>. - Do one of the following:
Click Perform now.
Use the Frequency options to schedule the job, and click Save.
-
After the job is complete, click Manage audit records, then select Show record counts for all time to identify how many audit records are being stored on the appliance.
Ensure that the record maintenance job has completed before proceeding to the next step.
Back up the Imprivata Database
Back up the Imprivata database before beginning the upgrade. A backup file can be used to restore the database if it becomes compromised.
Backing up the Imprivata database can take ten minutes or longer, depending on its size. During the backup, users experience no interruption in service. The backup file:
-
Contains the Imprivata database for the entire enterprise — not just a single site.
-
Does not contain configuration data for the enterprise, site, or appliance.
-
Is a compressed file that can be encrypted for increased security. The file name includes a date-time stamp. For example, a file named
20250801_132506.IBUis a backup that was created in the year 2025, on August 1, at 1:25:06 pm.
It is best practice to store the Imprivata database backup file in a secure location off the appliance:
-
If you have configured a default file server for the appliance, the backup process automatically saves the backup file to the location.
-
If you have not configured a default file server, the backup process saves the backup file to the appliance. In that case, you should download it to a secure location.
For more information on using the Imprivata Appliance Console to configure a file server, see "Imprivata Network Settings" in the Imprivata Enterprise Access Management Online Help.
Create the Imprivata database backup file from an Imprivata database appliance.
NOTE: An Administrator or Super Administrator can create the backup file.
To create the backup file:
-
In the Imprivata Appliance Console, go to the System page > Operations tab.
-
Click Start Backup.
-
(Optional)—To encrypt the backup file, select Encryption Enabled.
CAUTION: Take note of the password. If you forget the password, you are unable to use this file to restore the database.
-
Click OK. The backup is complete when the Operations page lists the status as SUCCESS.
If you have configured a file server, the backup process saves the file to this location.
-
If you have not configured a file server, click Save to download the file. Store it in a secure location.
Configure Failover
By default, Imprivata agents communicate with appliances in their home site. Configuring appliances for failover between sites let agents communicate with appliances across the enterprise, helping to ensure uninterrupted service during the upgrade.
To configure site failover:
-
In the Imprivata Admin Console, go to the gear icon menu > Sites.
-
Select a site from the list.
-
Go to the IP Addresses and Failover section, and select Allow computers belonging to this site to failover to other sites?
-
Select the primary failover site. Select failover sites with sufficient capacity to support both failed-over and regular users.
NOTE:For fourth generation (G4) enterprises, Imprivata discourages the use of secondary failover sites, because Imprivata recommends having at most two sites in a G4 enterprise.
-
Click Save.
-
Repeat steps 2-5 for each site in the enterprise.
Upgrade the Imprivata Appliance
The following sections detail how to upgrade an Imprivata appliance.
Before You Upgrade
Before you upgrade, complete the following steps.
Confirm that there are no issues with the enterprise database replication for each database appliance in the enterprise.
To confirm the enterprise database replication status of an appliance:
-
In the Imprivata Appliance Console, go to the System page > Operations tab.
-
In the Synchronize Enterprise Database row, verify that the status displays as Success.
Click to enlarge
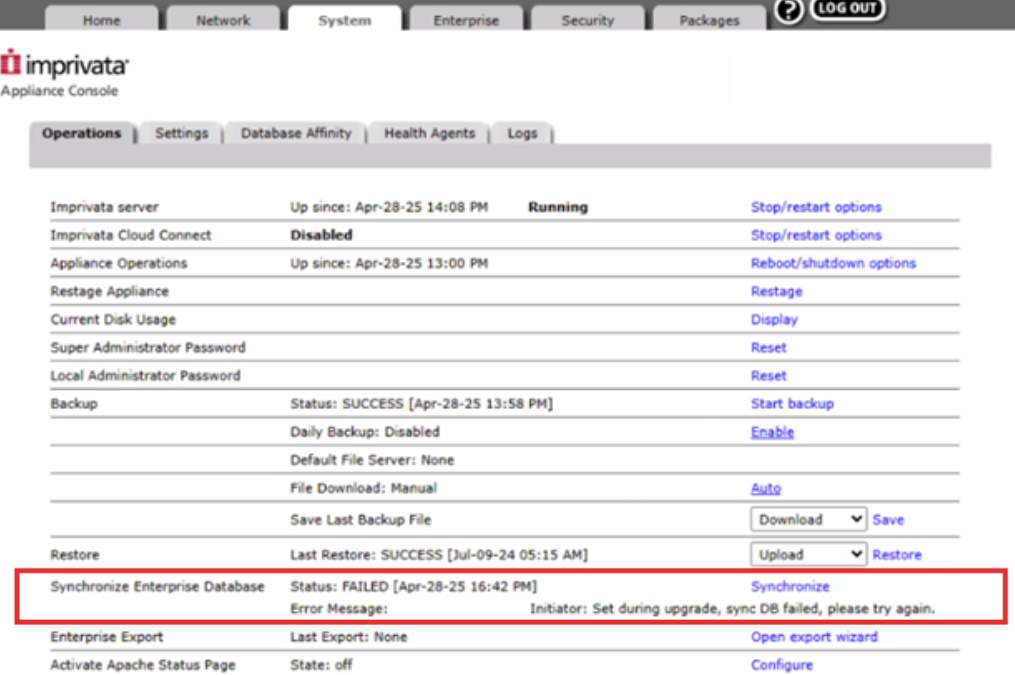 IMPORTANT:
If the row displays a status of Failed, do not proceed with the upgrade.
-
Take note of the status, the date and time stamp of the failure, and any error messages.
-
Collect the appliance logs and contact Imprivata Technical Support to resolve the issue and complete your upgrade.
-
In the event of an appliance failure, collect the appliance logs for Imprivata Technical Support.
To enable one-click collection and upload of appliance logs to Imprivata:
-
In the Imprivata Appliance Console, go to System > Logs > Log data export > Log data to include.
-
Select all available data.
-
To automate the delivery of logs to Imprivata, select Send a copy to Imprivata Technical Support; when selected, enter the case number provided by Imprivata Customer Support.
-
Click Start Export. The appliance will copy logs from various system directories and create an archive file. Clicking Start Export overwrites the previous log report.
A progress indicator is displayed while the logs are collected and exported; you can click Stop Export to cancel.
-
After the export is complete, click View Files to open the archive.
-
Repeat this process for additional appliances, if needed.
It is best practice to restart all appliances in the enterprise before the upgrade. To start a rolling reboot:
-
In the Imprivata Appliance Console, go to the System page > Operations tab.
-
Click Reboot/shutdown options.
-
Select Reboot all appliances, and click Go.
Confirm that the Imprivata server is running for each appliance in the enterprise. To confirm that the Imprivata server is running:
-
In the Imprivata Appliance Console, go to the System page > Operations tab.
-
Verify that the Imprivata server status is Running.
Confirm that there are no issues with the system services for each appliance in the enterprise.
To confirm the system status of an appliance:
-
In the Imprivata Appliance Console, go to the System page > Health Agents tab.
-
Verify that the status of each service is OK.
To confirm that the sites are running:
-
In the Imprivata Admin Console, go to the gear icon menu > Sites page.
-
Verify that the status of each site is Up.
NOTE:Sites that contain database appliances will display a status for the site. Any site which only contains service-only appliances will be empty.
Upgrade Your Imprivata Appliances
Complete the following steps to upgrade Imprivata appliances:
An upgrade from 24.1 to 25.4 requires that the installed version of the Imprivata G4 Platform Update (platform update) be applianceG4-2025-4-1 or later.
A more recent platform IPM may be available on the product downloads page for the release to which you are upgrading.
If this platform update is not installed to all appliances, install it before upgrading appliances.
Use one of the following methods for uploading:
-
Upload the platform update files from a file server connected to the G4 appliance.
NOTE: For more information on using the Imprivata Appliance Console to configure a file server, see "Imprivata Appliance Settings" in the Imprivata Online Help.
-
If you cannot use a file server, upload the IPM from your local computer, using the Imprivata Appliance Console > Packages tab, do the following:
-
Upload the applianceG4-2025-4-1 (or later) platform update file.
-
Distribute the platform update to your G4 appliances.
-
Install the platform update.
IMPORTANT:Do not select the option to install on all appliances at once. Due to the time required to install the platform update, Imprivata recommends you to only install this update on each appliance in the enterprise manually.
-
Upgrade to the latest available version of 25.4.
This upgrade supports a zero–downtime upgrade. All appliances are upgraded at the same time.
When updating the G4 Imprivata update IPM, all appliances in the enterprise must be at the same hotfix release.
To distribute and install the appliance update:
-
Log into the Imprivata Appliance Console. Go to the Packages tab.
-
Click Upload Imprivata Package, specify the file, and then click Upload.
-
Click Distribute, and then Send, to copy the IPM to all appliances in the enterprise.
-
Click Done when the distribution is finished.
-
From the Imprivata Appliance Console, select the IPM and click Install. The IPM Information page appears and Install IPM on all appliances is selected.
-
Click Install.
IMPORTANT:The appliance upgrade may take 45 to 90 minutes, or possibly longer, to complete. While all appliances are being upgraded, the Imprivata Admin Console locks, and all administrative functionality is unavailable.
Even if the Imprivata Admin Console is available after you start the upgrade, do not use it.
Changes you make using the Imprivata Admin Console may be lost during the upgrade.
Upgrade Failures
If the upgrade fails for any reason, error messages are displayed on the Imprivata Appliance Console.
-
Do not attempt to run the upgrade again.
-
Do not remove any of the appliances from the enterprise, as doing so would leave the enterprise in a corrupted state.
-
Do not attempt to upload other IPMs of a lower or higher version to attempt another upgrade, as doing so would leave the enterprise in a corrupted state.
-
Do not initiate a reboot or restart of the server or VM if you are not certain whether the upgrade is still in progress.
Collect the appliance logs and contact Imprivata Technical Support to resolve the issue and complete your upgrade.
In the event of an appliance failure, collect the appliance logs for Imprivata Technical Support.
To enable one-click collection and upload of appliance logs to Imprivata:
-
In the Imprivata Appliance Console, go to System > Logs > Log data export > Log data to include.
-
Select all available data.
-
To automate the delivery of logs to Imprivata, select Send a copy to Imprivata Technical Support; when selected, enter the case number provided by Imprivata Customer Support.
-
Click Start Export. The appliance will copy logs from various system directories and create an archive file. Clicking Start Export overwrites the previous log report.
A progress indicator is displayed while the logs are collected and exported; you can click Stop Export to cancel.
-
After the export is complete, click View Files to open the archive.
-
Repeat this process for additional appliances, if needed.
Next Steps and Best Practices
After your Imprivata enterprise is upgraded, complete the following steps:
Appliance failover was configured to help ensure uninterrupted service during the upgrade. If you enabled appliance failover for the upgrade only, you may want to disable it now.
Back up the Imprivata database immediately:
-
If the database becomes corrupted or compromised, you can use the backup file to restore the environment. For more information, see Create the Imprivata Backup File.
-
If you have not scheduled an automatic daily backup, consider configuring it now.
NOTE: For more information, see "Backing Up the Imprivata Database" in the Imprivata Online Help.
Scheduling audit record maintenance helps to ensure that audit records are regularly archived and deleted.
If you have not scheduled recurring audit record maintenance, consider configuring it now.
To archive and delete audit records:
-
In the Imprivata Admin Console, go to the gear icon menu > Settings page.
-
Go to the Audit Records section.
-
Click Manage audit records, then select Show record counts for all time to identify how many audit records are being stored on the appliance.
-
Go to the Record Maintenance section, select Archive and Delete, and specify the minimum age of records to be archived.
NOTE:Although all audit records are archived, regulated audit records that must be retained for a specific period of time are not deleted from the appliance.
-
In Save location, enter the relative path of the location on the file server.
NOTE:If the path is blank for an SCP server, the archived records are saved to the home folder of the account. For example:
/home/<user>. - Do one of the following:
Click Perform now.
Use the Frequency options to schedule the job, and click Save.
-
After the job is complete, click Manage audit records, then select Show record counts for all time to identify how many audit records are being stored on the appliance.
After your Imprivata enterprise is upgraded, you can upgrade the Imprivata agents.
Review Supporting Documentation
When determining whether to upgrade the Imprivata agents, review the following documentation available on the Product Downloads page for the
-
Release Notes — for new and improved features and technology updates.
-
Fixed Issues List — for the latest hotfix in the release. Includes information on server and client fixes.
-
Supported Components - for the supported configurations and endpoint types for your environment. For Imprivata Enterprise Access Management, see the Imprivata Environment Reference portal.
Familiarize yourself with the requirements, new features and enhancements, and other information associated with the release to which you are upgrading.
Appliance and Agent Compatibility
-
The Imprivata appliance release is backwards compatible with older agent releases. An agent can be of the same release as the appliance, or downlevel.
-
For configurations that include endpoints connecting to a Citrix server, the following agent compatibility is expected:
-
Citrix server agents are backward compatible with older endpoint agents.
-
When upgrading an environment containing Citrix, the required upgrade order is:
-
Appliances
-
Citrix agent
-
Endpoint agents
-
-
Run a report to identify the Imprivata agent releases installed on your endpoints.
To run the report, in the Imprivata Admin Console, click Reports > Agent deployment report.
What to Expect
Consider the following information when upgrading Imprivata agents:
-
Endpoints require a restart after upgrading the Imprivata agent software.
IMPORTANT:Depending on your environment, you may need to carefully schedule Imprivata agent upgrades, because of the requirement to restart the endpoints.
Next Steps
There are two ways to update Imprivata agents:
-
If Imprivata agents are set to automatically update, they do so at the next refresh interval after the appliance is upgraded.
To verify this setting in the Imprivata Admin Console, go to the Agent Upgrades section on the General tab of the computer policy (Computers > Computer policies).
-
If Imprivata agents are not set to automatically update, you must push the appropriate MSI file.
To locate the agent MSI files in the Imprivata Admin Console, go to the Deploy agents page (Computers > Deploy agents).
Test and Validate EMR-Specific Workflows
Before upgrading all of the Imprivata agents in your enterprise, conduct testing with a subset of upgraded Imprivata agents.
Test and validate your EMR-specific workflows with a small set of upgraded Imprivata agents. Depending on your organization, these might include the following workflows:
-
Application profiles, using the Imprivata APG.
-
Single sign-on into your EMRs
-
MFA for clinical workflows
-
MFA for EPCS