Capturing a Summary Screen — Patient Enrollment
Capturing a summary screen requires you to identify and define the controls that gather the patient information your chosen application requires. There are several common methods of doing this, depending on the target application.
For ease of consumption, these instructions are divided by those types. Note that you may need to use one or all to capture a screen, in any order.
- Select Patient Summary in the Application Screens page. The Learn Screen page opens.
- Drag the magnifier icon from Learn Screen and drop it on the application screen. The Imprivata APG displays the capture results, with Patient Information fields at the top, and Additional Screen Controls below.
Capturing Simple Information Fields
To capture fields that appear in the Patient Information area of the APG capture screen, and contain one type of information:
-
Use the Locate Field buttons to identify the fields on the screen, and set a value for each.
For example, if the Locate Field highlights a patient name field, you would choose the appropriate patient name value (first, last, full) from the list. The key information for this profile is patient identifier and date of birth. Name and gender are optional.
-
Some values require additional configuration, indicated by a gear icon beside the value list. Click the gear icon to configure the value.
For example, a date of birth field requires you to set the format used by the application you are profiling.
- Set an identity pairing field, if required: return to the Additional Screen Controls area, locate the onscreen text label associated with the field you configured, and check the Reference Label box to the right. The label text appears in the Patient Information area.
-
Go to the Patient Information area, and select the value for the label you just added, using the paired identifier.
For example, if you set "Name (Full)" in step 1, you would choose "Label for Name (Full)".
For more information on Patient Name and Date formatting, see APG Reference.
Capturing Other Required Fields
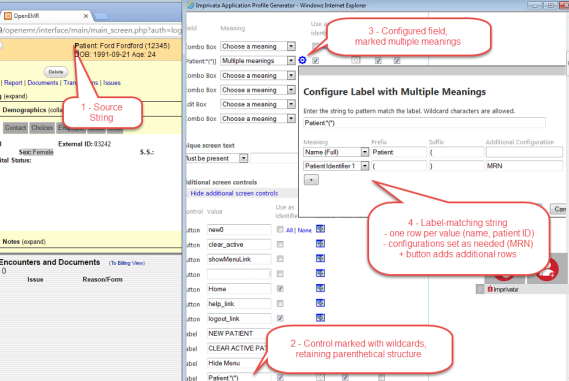
If there are required fields that do not appear in the Patient Information area, you can locate them in the Additional Screen Controls area and capture them.
To capture other required fields:
-
Clear all of the Use as Identifier checkboxes in the Additional Screen controls area.
-
Locate the field you want to add in the Additional Screen Controls area, select Use as Identifier, and replace its value with a wildcard character (*), then check the Patient Information box in the column to the right. The field appears in the Patient Information area.
-
Go to the Patient Information area, select a meaning for the new field, and configure it as needed by clicking the gear icon beside it. The values selected here must match any configured in PatientSecure, including case.
-
Return to the Additional Screen Controls area, locate the label associated with that value, and check the Reference Label box to the right. The label text appears in the Patient Information area.
-
Go to the Patient Information area, and select the value for the label you just added, using the same identifier as you used in Step 3. This anchors the value you selected to this label text. This image shows the result.
 Example
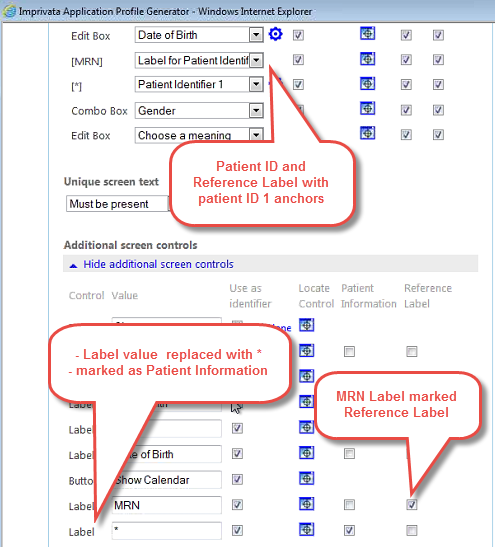
Adding an MRN label
-
Locate the MRN number displayed on the screen you are capturing in the Additional Screen Controls area.
-
Enter * in the value text box, and select the Patient Information checkbox. This is because any value may appear in the entry box, not a specific number.
-
In the Patient Information area, locate the *, and select Patient Identifier 1 from the drop-down list beside it.
-
Click the gear icon beside your new entry, enter MRN in the tag dialog, then click OK.
-
Return to the Additional Screen Controls area and find the label for the MRN field. Select the Reference Label checkbox beside it.
-
Locate MRN in the Patient Identifier area, and select Label for Patient Identifier 1 from the drop-down list.
Now the profile will recognize a valid value entered in the field marked "MRN" as an MRN number.
-
Capturing and Parsing Complex Fields
-
Find the field that contains the information you want.
-
Construct a parsing string as illustrated here:
Completing Your Profile
-
Click Done Configuring This Screen when you are finished. The Learn Screen page closes. Then click Save in the Imprivata APG.
-
If you need to capture another screen for this profile, open the screen, return to the Imprivata Admin Console and click the appropriate Patient Search, Patient Summary or Add Screen Type button, depending on what type of screen you want to capture.
-
You can test your results by selecting the profile and clicking Deploy to deploy the application and enable the profile, then returning to the application to check for appropriate behavior.