Capturing a Search Screen — Patient Authentication
To capture a search screen:
-
Select Patient Search in the Application Screens page. The Learn Screen page opens.
-
Drag the magnifier icon from Learn Screen and drop it on the application screen. The Imprivata APG displays the capture results, with Patient Information fields at the top, and Additional Screen Controls below.
-
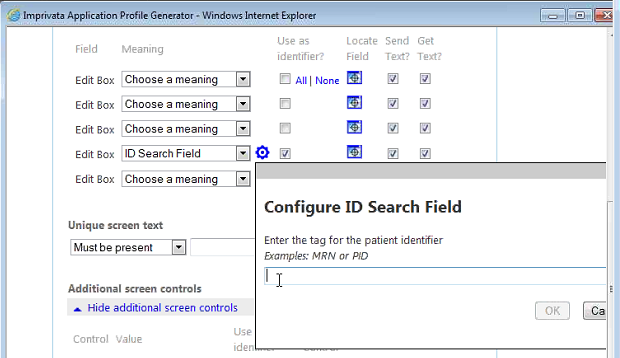
A patient identifier (MRN or PID) is the key information for this profile. Use the Locate Field buttons in the Patient Information section to identify the Edit Box that contains the patient identifier.
-
After you have identified a field, choose the meaning you want from the list beside it.
For example, set an MRN field to ID Search Field.
-
If a gear icon appears beside a field entry, click it to perform additional required configuration, as shown below. The values selected here must match any configured in PatientSecure, including case.
- Set the identity pairing for this field: return to the Additional Screen Controls area, locate the on-screen text label associated with the Patient ID value, and select the Reference Label box to the right. The label text appears in the Patient Information area.
-
Go to the Patient Information area, and select the value for the label you just added, using the paired identifier.
For example, if you set "ID Search Field" in step 4, you would choose "Label for ID Search Field. "
- Clear the field check boxes that you do not need.
-
Clear the check boxes in the Additional Patient Information area, retaining only those that provide a unique identity to the screen.
For example, if the screen always shows Patient Name and SSN labels, you could leave those selected. That provides the profile additional information to distinguish the proper screen.
-
Use the Workflow and Patient Entry section at the bottom of the dialog to set automatic behaviors, or customize entry values.
For example, you could set the profile to Automatically display the PatientSecure Identify screen when this screen is recognized.
- Click Done Configuring This Screen when you are finished. The Learn Screen page closes.
- If you need to capture another screen for this profile, open the screen, return to the Imprivata Admin Console and click the appropriate Patient Search, Patient Summary or Add Screen Type button, depending on the type of screen you want to capture.
- If the profile is complete, click Save in the Imprivata Admin Console.
- You can test your results by selecting the profile and clicking Deploy to deploy the application and enable the profile, then returning to the application to check for appropriate behavior.