Microsoft Entra ID Only Joined Devices
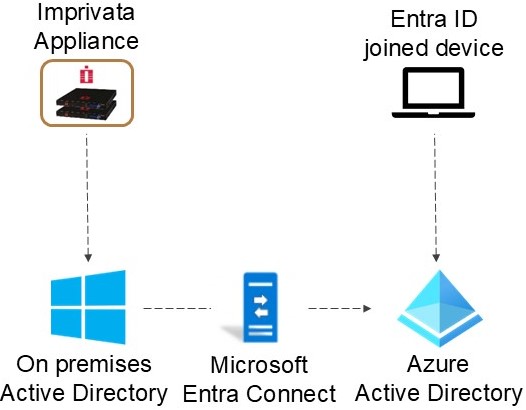
Imprivata Enterprise Access Management supports enterprises with devices joined to Microsoft Entra ID and users managed on Active Directory. This topic describes a configuration where Microsoft Active Directory maintains users, and AD syncs with Microsoft Entra ID via Entra Connect.
Click to enlarge.
For other supported configurations, see Microsoft Entra ID Support.
-
Entra ID in Managed mode is supported. Federation mode is not supported at this time.
-
Kerberos authentication is not supported at this time.
Install and Configure Entra Connect
-
Download Entra Connect from Microsoft:
https://www.microsoft.com/en-us/download/details.aspx?id=47594 -
Install Entra Connect on a dedicated Windows Server.
-
Run Entra Connect Wizard:
-
Choose Customize for more options.
-
Select your sign-in method based on your needs:
-
Password Hash Synchronization (PHS) Syncs password hashes from AD to Entra ID. PHS enables users to authenticate against Microsoft 365 and other cloud services using their on-premises AD credentials without needing AD FS or Pass-Through Authentication (PTA). However, PHS can cause a delay during password synchronization: the user must wait approximately 5 minutes after the password has been changed or reset before accessing an Entra ID-joined device.
-
Recommended — Pass-Through Authentication (PTA). Users authenticate via on-premises AD. PTA ensures that AD is always treated as the primary "source of truth" for password verification.
-
-
Connect to your on-premises AD (enter Domain Admin credentials).
-
Connect to Entra ID (enter Global Admin credentials).
-
Configure Domain and OU filtering (if needed).
-
Enable Seamless SSO (optional but recommended).
-
-
Start Synchronization:
-
Sync users and groups.
-
Verify by viewing synchronized users on Microsoft Entra ID.
-
Verify that a user managed on AD can log onto an Entra-only joined device.
-
Entra ID Conditional Access Policies
You must exclude the Imprivata Azure AD Sync app from your MFA conditional access policies for this feature. This requirement is due to a Microsoft blocker.
-
In Entra ID, go to Security > Conditional Access, and select a policy that applies to your Imprivata users and requires MFA.
-
To exclude your Imprivata app, go to Cloud apps or actions > Cloud apps > Exclude > Select excluded cloud apps, and select the Imprivata Azure AD Sync app.
-
Click Save.
-
Repeat for all conditional access policies that apply to your Imprivata app and require MFA.
Microsoft-managed policies don't allow you to exclude specific cloud apps. If you have a Microsoft-managed policy that requires MFA, recreate it so you can exclude the Imprivata Azure AD Sync app, and then turn off the Microsoft-managed policy.
Imprivata Appliance Configuration
Adding on-premises Active Directory to your existing Imprivata Enterprise Access Management setup:
-
In the Imprivata Admin Console, go to Users > Directories > Add
-
On the Select Directory Server page > Add New Imprivata Domain, select MS Active Directory, and click Next.
-
On the Connection Parameters page, enter the relevant information about your domain.
-
Click Save, or Synchronize Users to proceed with user synchronization.
