Remote Access with Citrix NetScaler Gateway
Imprivata Confirm ID integrates with Citrix NetScaler Gateway to streamline authentication management and simplify two-factor authentication for remote access for employees. In addition to logging in remotely, Imprivata Confirm ID users can also enroll authentication methods from outside your network.
Imprivata Confirm ID also offers a customized user interface for Citrix NetScaler. When logging in remotely and enrolling authentication methods, the user interface resembles the Imprivata Confirm ID enrollment utility on the Imprivata agent.
Before You Begin
Review Imprivata Confirm ID Supported Components to confirm that your version of Citrix NetScaler Gateway is supported. Fully configure your Citrix NetScaler Gateway environment for remote access with single-factor username and password authentication before configuring its connection to Imprivata.
To plan your rollout and learn how Remote Access works, start here.
Remote Access with Imprivata ID
This is one example of a typical Remote Access configuration; your gateway software and Confirm ID configuration may vary.
Diagram: Two-Factor Remote Access Authentication
The Imprivata Cloud Remote Access experience overlays an Imprivata-powered graphical login screen on top of the NetScaler default login screen.
This graphical login screen authenticates the user with Imprivata Confirm ID via the Imprivata Cloud. Only after the authentication is complete, Imprivata Confirm ID sends the following to Citrix NetScaler:
- Username and Password go to the Citrix LDAP primary authentication
- Username and an authentication success token go to the Citrix RADIUS secondary authentication
Unlike the legacy Remote Access experience that required 30 seconds for the users to respond and complete the authentication, the Imprivata Cloud Remote Access experience only requires time to send this one message to Citrix NetScaler.
Also, you do not have to replace the LDAP connection between your gateway and Active Directory: You can easily maintain your existing single-factor remote access login experience while you roll out Imprivata Confirm ID Remote Access.
click to enlarge
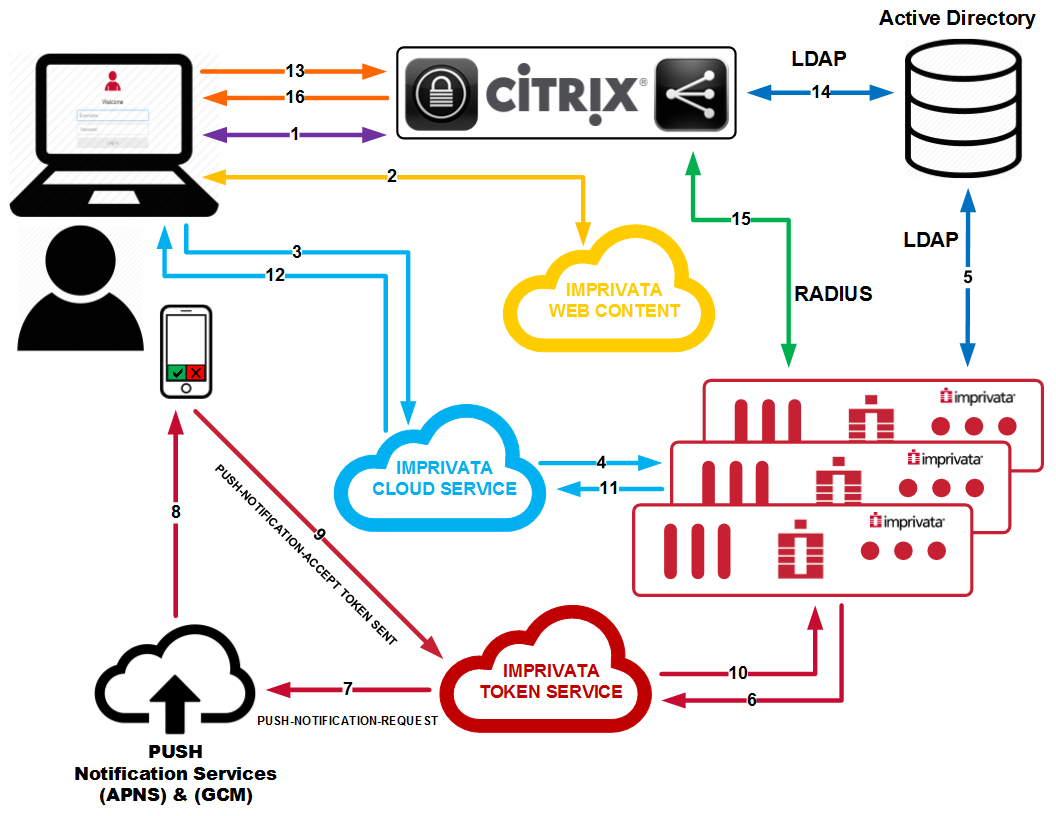
- Primary authentication initiated to the Citrix NetScaler Gateway. In the background, the browser renders the login page with three fields (e.g. username, password1, password2.)
- The browser downloads Imprivata web content. The initial login page is overlaid with Imprivata’s custom login featuring only username and password fields.
- The user enters his username and password. This information is sent to the Imprivata Cloud Service.
- The Imprivata Cloud Service sends the user’s credentials to the customer’s on-premises Imprivata appliance.
- The Imprivata appliance verifies the username and password with Active Directory (or another directory service.)
- The Imprivata appliance sends a push token request to the Imprivata Cloud Token Service.
- The Imprivata Cloud Token Service sends a push notification to the proper notification service (e.g. APNS or GCM.)
- The notification service sends the push notification to the user’s phone.
- The user accepts the push notification. The user’s phone sends a token back to the Cloud Token Service.
- The Cloud Token Service sends a 'push token accepted' to the Imprivata appliance.
- The Imprivata appliance sends an 'access accept' with a secure token to the Imprivata Cloud Service.
- The Imprivata Cloud Service forwards the secure token to the user’s browser.
- The user’s browser sends his username, password, and the secure token in the second password field.
- Citrix NetScaler Gateway verifies the username and password. The group and other attributes are sent back to the gateway for authorization.
- Citrix NetScaler Gateway verifies the Imprivata secure token over RADIUS to the Imprivata appliance.
- Citrix NetScaler Gateway access granted to the user.
Cloud-Based Remote Access Integration
Integrate your Imprivata Confirm ID environment with Citrix NetScaler.
-
In the Imprivata Admin Console, go to Applications > Remote access integrations.
-
Click Citrix NetScaler > Add new integration.
If your connection to the Imprivata cloud looks good, your Customer ID will appear.
Cloud Connection
Imprivata Services will enter the Enterprise ID and one-time cloud provisioning code required to establish trust between your Imprivata enterprise and the Imprivata cloud:
- If you're not on the Cloud Connection page already: In the Imprivata Admin Console, click the gear icon > Cloud connection.
- Services will enter your Enterprise ID and cloud provisioning code.
- Click Establish trust.
The cloud connection must be established by Imprivata Services.
Cloud Connection Status
You can review the status of your enterprise's connection to the Imprivata cloud at any time. Status notifications are displayed on the Imprivata Admin Console, and the cloud connection status of every appliance at every site is also available:
-
In the Imprivata Admin Console, go to the gear icon > Cloud connection.
-
Every appliance host is listed with its status. If there are problems with a connection, recommendations for resolving the problem are displayed here.
Add New Citrix NetScaler Integration
-
On the Add new Citrix NetScaler integration page:
- Enter a descriptive Nickname
- Enter the Hostname or IP address of the Citrix NetScaler client. (The Citrix NetScaler client may also be referred to as the Network Access Server (NAS) or RADIUS client);
-
Enter the Encryption key (shared secret).
BEST PRACTICE: This encryption key will be used as a shared secret between your RADIUS server (Imprivata appliance) and RADIUS client (Citrix NetScaler). Use a computer-generated string 22-30 characters in length.
You do not need to repeat this process for each Imprivata appliance. This client configuration is distributed to all Imprivata appliances in your enterprise.
- Optional — Some RADIUS clients demand return information about authenticating users in the form of RADIUS attributes. You can add these attributes here.
- Click Save and get integration script. Contact your Citrix administrator to include the script in a rewrite script (see below). This script is also available on the Imprivata Admin Console > Applications > Remote access integrations page.
Configure Two Factor Authentication via the Imprivata Cloud
In the following sections, you will create a new rewrite action, create a new secondary authentication RADIUS policy, and bind it to your NetScaler Gateway virtual server.
This rewrite policy is triggered when a user visits your NetScaler Gateway login page. The rewrite overlays an Imprivata-powered graphical login screen over the NetScaler default login screen. The integration script points Citrix NetScaler to the Imprivata Cloud to grab the Imprivata Confirm ID user interface.
This topic offers instructions on making these configurations via CLI commands, or in the Citrix NetScaler graphical user interface console. When using the console, Citrix may present a warning message "Classic authentication policies are deprecated". You can safely ignore these messages.
Your Current Citrix NetScaler Environment
Before you add two-factor authentication, Your Citrix NetScaler production environment should be configured with an LDAP policy for primary authentication. You will be adding a secondary authentication RADIUS policy below.
Create Rewrite Action
In the Citrix NetScaler console, go to AppExpert > Rewrite > Actions > Add.
Configure the fields as follows:
| Name | sample-rewrite-action
|
Give your rewrite action a descriptive name. |
| Type | INSERT_BEFORE_ALL
|
Inserts the expression before the search text. |
| Expression to choose target location | HTTP.RES.BODY(1000000)
|
1 million characters in the HTTP response body. |
| Expression to insert with | Enter the integration script here. | The integration script is available on the Imprivata Admin Console #160;Applications > Remote access integrations page. |
| Search type = Text | </body> |
|
Create Rewrite Action using the CLI
Edit the sample command below to create the rewrite action via the command line:
- Replace the code in blue with your enterprise's unique integration script. The integration script is available on the Imprivata Admin Console > Applications > Remote access integrations page.
- The integration script needs to be surrounded with single quotes.
- Single quotes inside the integration script need to be 'escaped' with a backslash.
add rewrite action sample-rewrite-action insert_before_all HTTP.RES.BODY(1000000) '"<script src=\'https://cidra.integration.common.imprivata.com/static/js/embed/netscaler.js\' data-access-token=\'eyJ0ZW5hbnRJZCI6IjQyNTQ3NzU5ODUwMDM2MzUzNiIsCiJjb250ZXh0RGF0YSI6CnsiYXV0aEFwcElkIjoiTmV0c2NhbGVyIiwKImF1dGhJbnN0YW5jZUlkIjoiMDkxNDdiNzktYjEwNS00" + "NWQzLTk0N2ItNzliMTA1NjVkM2VhIn19\'></script>"' -search "text(\"</body>\")"
Create Rewrite Policy
In the Citrix NetScaler console, go to AppExpert > Rewrite > Policies > Add.
Configure the fields as follows:
| Name | sample-rewrite-policy | Give your rewrite policy a descriptive name. |
| Action | sample-rewrite-action | Select the rewrite action you created in the previous section. |
| Expression | HTTP.REQ.URL.ENDSWITH("vpn/index.html")||HTTP.REQ.URL.ENDSWITH("logon/LogonPoint/index.html")
|
If expression is true, then the rewrite action is performed: This will ensure the rewrite action is only triggered on pages that end with these strings:
|
Create Rewrite Policy using the CLI
Use the sample command below to create the rewrite policy via the command line. Inner quotes, single and double need to be 'escaped' with a backslash:
add rewrite policy sample-rewrite-policy "HTTP.REQ.URL.ENDSWITH(\"vpn/index.html\")||HTTP.REQ.URL.ENDSWITH(\"logon/LogonPoint/index.html\")" sample-rewrite-action
Bind Policy to Virtual Server
In the Citrix NetScaler console, go to Netscaler Gateway > Virtual Servers > Edit > Policies > Add (+)
Configure the fields as follows:
| Choose Policy | Rewrite | |
| Choose Type | Response | Action will be applied to the HTTP response. |
| Select Policy | Rewrite Policy | Select the rewrite policy created above. |
| Priority | 100
|
|
| Goto Expression | END
|
Because there are no additional rewrite policies. (If you add subsequent rewrite policies, this value must be set to NEXT.) |
Bind Policy to Virtual Server using the CLI
Use the sample command below to bind the policy to the virtual server via the command line:
bind vpn vserver sample-virtual-server -policy sample-rewrite-policy -priority 100 -gotoPriorityExpression END -type RESPONSE
Create RADIUS Server
In the Citrix NetScaler console, go to Netscaler Gateway > Policies > Authentication > RADIUS > Servers
Click Add.
Configure the fields as follows:
| Name | sample-radius-server
|
Give your server a descriptive name. |
| Server Name or IP Address | server1.sample.com
|
|
| Port | 1812 | |
| Secret Key | Enter the Secret Key, and again in the Confirm Secret Key field. |
This is the same key as the "encryption key" entered in the Imprivata Admin Console > Applications > Remote access integrations. |
| Time-out (seconds) | 3 |
Create Authentication RADIUS Policy
In the Citrix NetScaler console, go to Netscaler Gateway > Policies > Authentication > RADIUS > Policies"
Configure the fields as follows:
| Name | Example Auth RADIUS Policy
|
Give your policy a descriptive name. |
| Server | server1.sample.com
|
|
| Expression | ns-true
|
Bind RADIUS Policy as a Secondary Authentication
In the Citrix NetScaler console, go to Netscaler Gateway > Virtual Servers > Edit > Policies > Add (+)
Configure the fields as follows:
| Choose Policy | RADIUS | |
| Choose Type | Secondary | |
| Select Policy | Example Auth RADIUS Policy
|
Select the Secondary Authentication RADIUS policy above. |
| Priority | 100
|
Create RADIUS Server and Policy using the CLI
Use the sample command below to create a secondary RADIUS server via the command line.
- Replace the server name in blue with the name of your authentication RADIUS server.
- Replace <shared secret> with the secret key / shared secret you created in the Imprivata Admin Console:
add authentication radiusAction sample-radius-server -serverName server1.sample.com -serverPort 1812 -radKey <shared secret>
add authentication radiusPolicy sample-radius-policy ns_true sample-radius-server
Create Bind Policy for the Secondary using the CLI
Use the sample command below to create the bind policy for the secondary via the command line.
bind vpn vserver "Example vpn virtual server" -policy "Example auth radius policy" -priority 100 -secondary
Optional — Number Matching
Multi-factor authentication fatigue attacks, also known as "MFA bombing", are a common cyberattack strategy. In an MFA fatigue attack, the attacker sends MFA push notifications to a registered user. The user may accidentally or absent-mindedly accept one of these push notifications, giving the attacker access to protected resources. This type of attack is generally preceded by phishing of the registered user’s login credentials.
With Imprivata’s Number Matching authentication enabled, users must enter a 2-digit code into Imprivata ID that matches the randomly generated number displayed on the application being accessed. This reduces the risk of the user accepting a push notification they did not initiate, and keeps your digital assets out of the hands of bad actors.
In the Imprivata Confirm ID Legacy Remote Access experience, users will not receive a push notification. They must manually enter the Imprivata ID token code from their mobile device. In this environment, Imprivata does not control the user interface, so Imprivata cannot provide same workflow used in Imprivata's Remote Access Cloud implementation.
Setup
-
In the Imprivata Admin Console, go to Users > Workflow Policy.
-
On the Confirm ID workflow policy page > Authentication Options, select Require Web SSO and remote access users to enter a code when using Imprivata ID for MFA (number matching)
Number Matching authentication is available for Imprivata Confirm ID Remote Access and Imprivata WebSSO only. Number Matching authentication is not available for the feature Imprivata ID for Windows Access.
This feature does not add Imprivata ID push notifications with number matching to workflows that do not already require the user to accept push notifications. This feature only requires users to enter a 2-digit code within workflows that already require the user to accept Imprivata ID push notifications. See Expected Workflow, below.
Expected Workflow
In this example, the user is at an endpoint computer where the Imprivata Agent is not present, and/or they are completing WebSSO or Remote Access workflows that require the user to accept an Imprivata ID push notification:
-
The user is logging in remotely, or provides the URL for an app enabled for Imprivata Web SSO.
-
The user is prompted to enter their username and password.
-
After the user successfully enters their username and password, they are prompted to approve a push notification sent to their enrolled Imprivata ID. A two-digit code will be shown on the application or resource being accessed.
-
Imprivata ID will display the username and the application the user is accessing.
The code expires in 30 seconds.
-
After the user accepts the push notification, they are given access to the application/resource.
When authenticating to some sites, the user may need to manually enter the six-digit Token Code from Imprivata ID app.
For WebSSO, subsequent apps are automatically authenticated within the same browser and the same session.
If the user closes an app without logging out of the app, he can return to the app during the same session without logging in again.
If the user fails to enter the code correctly, or the code expires, the user must begin authentication again.
For this workflow, users must upgrade to the latest version of Imprivata ID on their mobile device. Users with versions of Imprivata ID before 2023.2 (iOS) or 2023.1 (Android) will not have the option to simply accept a push notification; they must manually enter the six-digit Token Code to authenticate to all sites.