Remote Access with Cisco ASA
Imprivata Confirm ID integrates with Cisco ASA to streamline authentication management and simplify two-factor authentication for remote access for employees. In addition to logging in remotely, Imprivata Confirm ID users can also enroll authentication methods from outside your network.
Before You Begin
Review Imprivata Confirm ID Supported Components to confirm that your version of Cisco ASA is supported. Fully configure your Cisco ASA environment for remote access with single-factor username and password authentication before configuring its connection to Imprivata.
Imprivata Confirm ID Remote Access supports both AnyConnect Client access and Clientless SSL VPN access; both solutions are documented here.
To plan your rollout and learn how Remote Access works, start here.
Diagram: Two-Factor Remote Access Authentication
click to enlarge
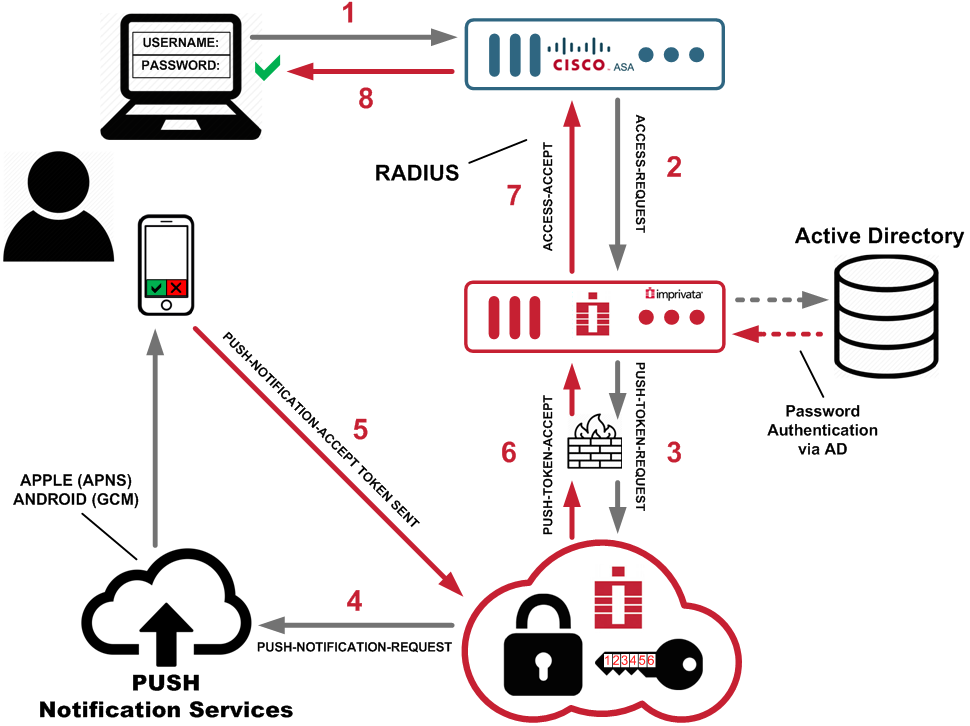
- The user initiates primary authentication to the Cisco ASA VPN Gateway.
- The Cisco ASA VPN Gateway sends a RADIUS access request to the Imprivata appliance.
- The Imprivata Appliance sends a push token request to Imprivata Cloud Token Service.
- The Imprivata Cloud Token Service sends a push notification to the Imprivata ID app on the user's device.
- The user accepts the push notification; the device sends token to Imprivata Cloud Token Service.
- The Imprivata Cloud Token Service sends a push token accept to the Imprivata appliance.
- The Imprivata appliance sends a RADIUS access accept to the Cisco ASA VPN Gateway.
- Cisco ASA VPN Gateway access granted to the user.
Configure Imprivata Remote Access
Add a New RADIUS Client
To enable Imprivata to serve your RADIUS client, name your RADIUS client and configure the NAS address / SNIP address on the Imprivata Admin Console:
- In the Imprivata Admin Console, go to Applications > Remote access integrations.
- Click Add new RADIUS client.
- On the Add new RADIUS client screen:
-
- Select a Client type
- Enter a descriptive Client name
- Enter the Hostname or IP address of the RADIUS client. (The RADIUS client may also be referred to as the Network Access Server (NAS) or VPN Server);
- Enter the Encryption key (shared secret).
-
BEST PRACTICE: This encryption key will be used as a shared secret between your server and RADIUS client. Use a computer-generated string of 22 to 64 characters in length.
You do not need to repeat this process for each Imprivata appliance. This client configuration is distributed to all Imprivata appliances in your enterprise.
- Click Save.
Optional — Non-licensed User Access
When you integrate Imprivata Confirm ID Remote Access with your gateway, the following users will be blocked from logging in:
- Imprivata Confirm ID users who are not licensed for Remote Access, and
- All non-Imprivata users: users not synced with the Imprivata users list.
However, you can override this default behavior and allow remote access for these users:
- In the Imprivata Admin Console, go to Applications > Remote access integrations.
- Select the RADIUS client.
- In the section Non-licensed user access, select Allow remote access for users without a Confirm ID for Remote Access license.
- Click Save.
This option uses Active Directory authentication for these users only, bypassing Imprivata Confirm ID authentication.
Active Directory Groups Queried
Users synced with the Imprivata appliance — The Imprivata appliance will query direct group and nested group memberships.
Users not synced with the Imprivata appliance — The Imprivata appliance will only query direct group memberships.
Troubleshooting — Nested Groups Not Queried
If you allow non-licensed user access and a non-Imprivata user is still blocked from Remote Access, their Active Directory group may be nested and not queried in this Remote Access Log In workflow.
Example — A user who is a member of Group1, where Group1 is a member of Group2 is not considered to be a member of Group2 and will not be queried for non-Imprivata users attempting Remote Access.
If you need to provide remote access to non-Imprivata users in nested groups, sync them with the Imprivata appliance. You do not need to license them for any Imprivata features. The sync alone will cause them to be queried by Imprivata Confirm ID for Remote Access.
CAUTION: All users synced with the Imprivata appliance must be added to a user policy. If you do not want these users consuming any licenses, verify that the user policy they're added to consumes no licenses (the Imprivata Admin Console may present a Caution on this user policy stating these users will not be able to log in; this message can be ignored in this specific case).
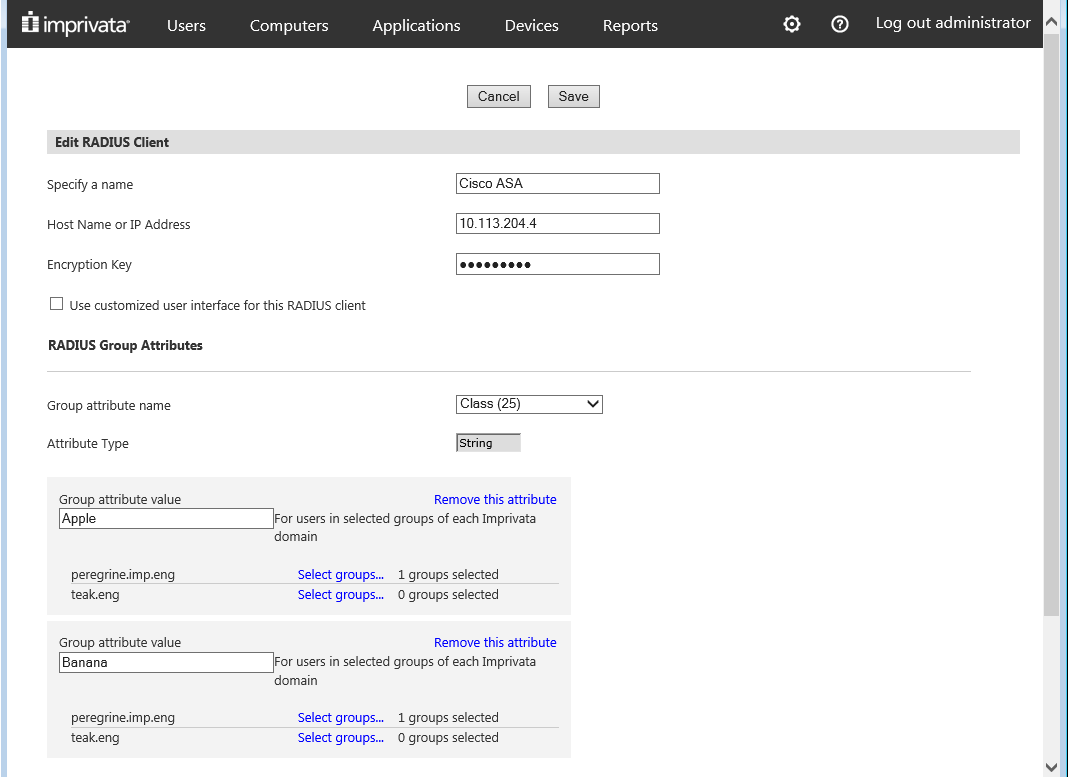
Optional - Configure RADIUS Group Attributes
Some RADIUS clients demand return information about authenticating users in the form of RADIUS attributes.
Troubleshooting The RADIUS Connection
You can troubleshoot the connection between your RADIUS client and the Imprivata appliance by viewing serverProxy.log:
- On the Imprivata appliance, go to System > Logs.
- In the section Log data export, export the log data for the period you wish to troubleshoot.
- Click View files.
- In the index of logs, open RadiusENA/serverProxy.log.gz
- The communication between the RADIUS client and the Imprivata appliance is logged here.
Examples
- If you see the message Source IP address [ip address] does not have a NAS entry, the IP address for the RADIUS client may have been entered incorrectly or not configured at all.
- If you see no entries in the log, and the Imprivata appliance does not respond to the request from the RADIUS client, this may mean:
- The IP address for the Imprivata appliance was not entered properly on the RADIUS client.
- The authentication port for the Imprivata appliance was not set to 1812 on the RADIUS client.
- If you see the message The Remote Authentication failed, either because the assigned user policy has no permission configured in the Authentication subtab OR the user's credentials failed, this may mean:
- The encryption key (shared secret) does not match on the RADIUS client and the Imprivata appliance; or
- The RADIUS client is configured to use an unsupported protocol.
- Push Notifications — If the Imprivata Admin Console reports an authentication via push notification succeeded, but the RADIUS client reports the authentication timed out, the timeout value on the RADIUS client may need to be increased.
To create and run a RADIUS Activity report, in the Imprivata Admin Console, go to Reports > Add new report.
CAUTION: Do not select the option Use graphical user interface for this RADIUS client. This option is not supported for Cisco ASA gateways at this time.
Configure Cisco ASA Access
Imprivata Confirm ID Remote Access supports both AnyConnect Client access and Clientless SSL VPN access:
Cisco ASA is a complex product with many features and settings. This document describes only configurations required to enable Imprivata Confirm ID Remote Access.
On the Cisco Adaptive Security Device Manager, create a new Cisco Clientless SSL VPN Profile for authentication with the Imprivata appliance:
Configure AAA Server Group
Configure a AAA Server Group for your Imprivata appliances:
-
Set up a new Server Group. Add an AAA Server with the IP address of your Imprivata appliance or your load balancer. You can also add more than one Imprivata appliance to the group to enable failover.
- Set up a new Server Group. Add an AAA Server with the IP address of your Imprivata appliance. You can also add more than one Imprivata appliance to the group to enable failover.
- If you have a load balancer, do not enter the IP addresses of your Imprivata appliances here: enter only the virtual IP address of your load balancer.
-
Set the Max Failed Attemptsto 1.
-
Set Reactivation Mode to Depletion.
-
Set the Dead Time value to 0.
-
Click OK.
Configure Servers In The Group
Edit each server in the AAA Server Group:
-
Set the Timeout value for each server to 60.
-
Set the Authentication Port field to 1812 (this is the default).
-
Set the Server Accounting port field to 1813 for accounting, or 0 for no accounting.
-
Set the Retry Interval value to 10.
-
Server Secret Key: Create a secret key to enter here. You will also enter this key as the "encryption key" in the Imprivata Admin Console (see Imprivata Remote Access).
-
Click OK.
NOTE: The Imprivata Confirm ID RADIUS server only supports PAP protocol. CHAP protocols are not supported. Configure your RADIUS clients for PAP protocol to support Imprivata Confirm ID.
Add Clientless SSL VPN Connection Profile
-
Go to Clientless SSL VPN Access > Connection Profiles and add a Connection Profile.
-
Give the profile a name.
-
Give the profile an alias; if you allow users to select a connection profile on the login page, the alias is what appears in the Group drop-down.
-
In the Authentication section, select Method : AAA.
-
Select the AAA Server Group you created above.
-
Click OK.
On the Cisco Adaptive Security Device Manager, create a new Cisco Clientless SSL VPN Profile for authentication with the Imprivata appliance:
Configure AAA Server Group
Configure a AAA Server Group for your Imprivata appliances:
-
Set up a new Server Group. Add an AAA Server with the IP address of your Imprivata appliance or your load balancer. You can also add more than one Imprivata appliance to the group to enable failover.
- Set up a new Server Group. Add an AAA Server with the IP address of your Imprivata appliance. You can also add more than one Imprivata appliance to the group to enable failover.
- If you have a load balancer, do not enter the IP addresses of your Imprivata appliances here: enter only the virtual IP address of your load balancer.
-
Set the Max Failed Attemptsto 1.
-
Set Reactivation Mode to Depletion.
-
Set the Dead Time value to 0.
-
Click OK.
Configure Servers In The Group
Edit each server in the AAA Server Group:
-
Set the Timeout value for each server to 60.
-
Set the Authentication Port field to 1812 (this is the default).
-
Set the Server Accounting port field to 1813 for accounting, or 0 for no accounting.
-
Set the Retry Interval value to 10.
-
Server Secret Key: Create a secret key to enter here. You will also enter this key as the "encryption key" in the Imprivata Admin Console (see Imprivata Remote Access).
-
Click OK.
NOTE: The Imprivata Confirm ID RADIUS server only supports PAP protocol. CHAP protocols are not supported. Configure your RADIUS clients for PAP protocol to support Imprivata Confirm ID.
Configure Connection Profile
Add or edit an AnyConnect Connection Profile:
-
Go to Network (Client) Access > AnyConnect Connection Profiles.
-
Add an AnyConnect Connection Profile.
-
Give the profile a name.
-
Give the profile an alias; if you allow users to select a connection profile on the login page, the alias is what appears in the Group drop-down.
-
In the Authentication section, select Method: AAA
-
Select the AAA Server Group you created above.
-
In the Client Address Assignment section > Client Address Pools: add your own DHCP server, or select the default DHCP address pool for this connection profile.
-
Click OK.
Configure Client Profile
Edit your Client Profile:
-
Select your AnyConnect Client Profile.
-
Click Edit.
-
Select Preferences (Part 2), and scroll to the bottom of the page.
- Set Authentication Timeout (seconds) to 60.
BEST PRACTICE: In large deployments, a load balancing solution should be used to distribute RADIUS traffic from Cisco ASA to all your Imprivata appliances in production. In a large deployment, you should not configure the Cisco Adaptive Security Device Manager to send all RADIUS requests to one Imprivata appliance.
After a user has authenticated they can be allowed or denied access to resources based on a Cisco authorization policy. The user authorization can be controlled using Dynamic Access Policy (DAP). When the user matches the selection criteria, they will be authorized to the access resources defined in the authorization policy attributes.
Add Dynamic Access Policy
In the Cisco ASDM for ASA, go to Configuration > Remote Access VPN > Clientless SSL VPN Access > Dynamic Access Policies and click Add.
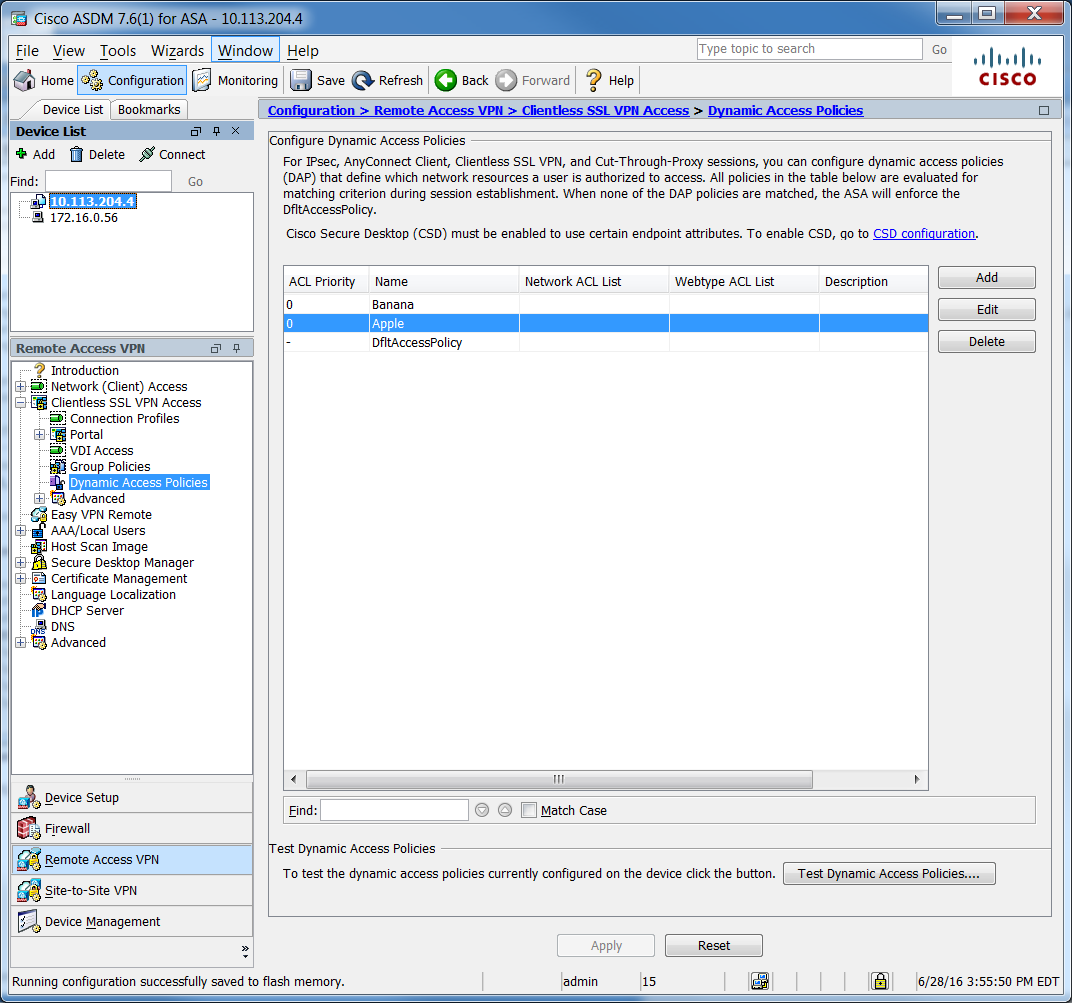
Define the Selection Criteria and Authorization Policy Attributes
The authorization selection criteria can be based on the authorization policy name that is returned by the Imprivata appliance via RADIUS attribute 25.
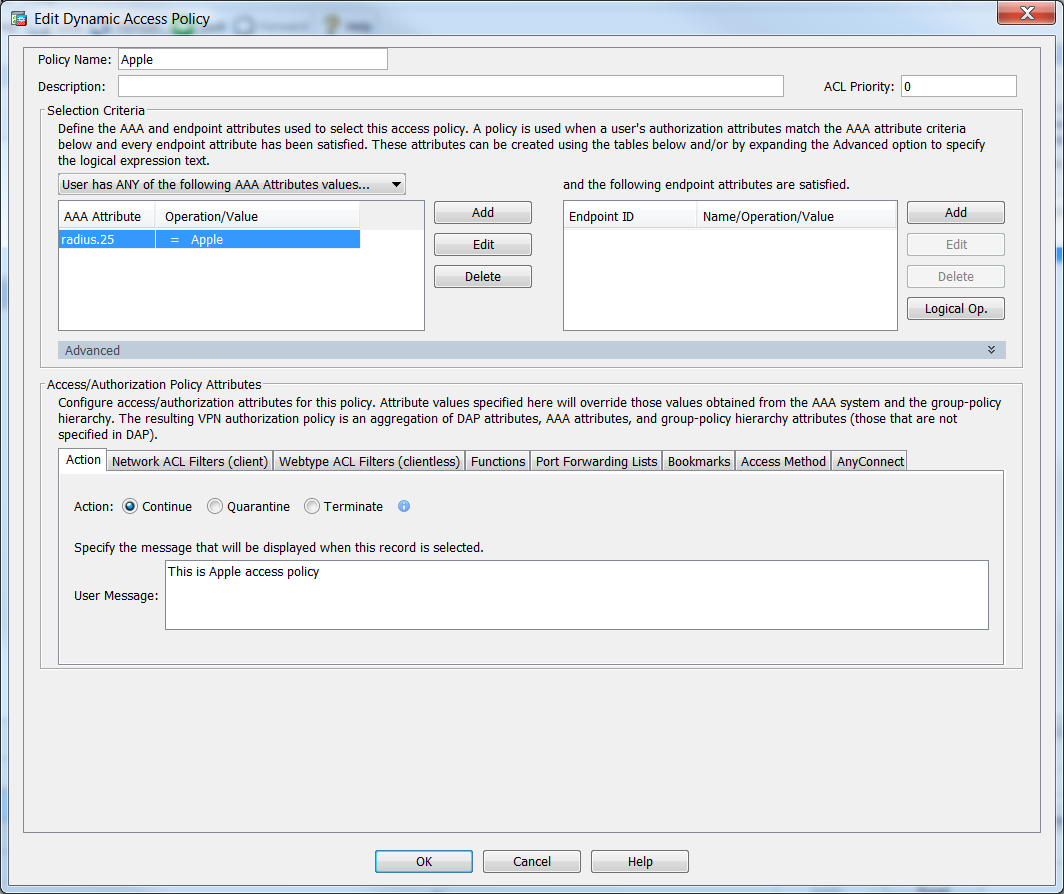
Imprivata Appliance RADIUS Group Attributes
On the Imprivata appliance, the RADIUS client can be configured to send the authorization policy name back to the NAS (Cisco ASA). The Imprivata appliance (RADIUS Server) sends the group attribute value back to the NAS in the RADIUS Access-Accept using AVP (Attribute Number 25 ). The attribute value sent is based on the AD groups the user is a member of. If multiple group attributes are define then it's based on the first match.
NOTE: If a user can be a member of more than one authorization policy, then the RADIUS Access-Access AVP must send a list of authorization policies in a single string, using a delimiter. To allow this, the os.props file must be modified with the parameters as follows.
Directory: /home/root/usr/share/apache-tomcat8/os.props
EnableMultiRadiusGroupAttr=1 //1 sets multiple groups enabled
MultiRadiusGroupAttrPrefix=xyz //Optional
MultiRadiusGroupAttrDelimiter=; //Optional, if NAS requires a specific delimiter between authorization policies. Default is a space.