Face Recognition as an Authentication Method
Applies to iOS and Android devices.
Imprivata Mobile Access Management supports face recognition as an authentication method for device check out, using the integration with Imprivata Enterprise Access Management as the identity provider.
Face Recognition Authentication Methods for Device Check Out
Some combinations of authentication factors available in Imprivata Enterprise Access Management are not supported by Mobile Access Management for device Check Out.
The following table illustrates the EAM primary and secondary authentication method selections and the resulting Check Out behaviors in MAM when used with face recognition.
| Primary | Secondary | Device Check Out Behavior |
|---|---|---|
| Check Out is initiated by the user tapping their proximity card on a Launchpad | ||
| Proximity Card | Face recognition |
|
Enabling Face recognition authentication requires that you:
-
Configure a connection to the Imprivata Cloud Platform.
-
Configure an identity provider (IdP) to authenticate users to the Imprivata Access Management portal.
-
Configure Entra ID and sync your users with the Imprivata Cloud Platform.
After configuring Entra ID and syncing users with the Imprivata Cloud Platform, verify that the users exist in the Imprivata Access Management portal (access.imprivata.com).
-
Configure a user policy to enable Face recognition.
Prerequisites
Take note of the following prerequisites:
-
Imprivata enabled the Check Out feature for your organization.
-
You have met the prerequisites for the Check Out and Password AutoFill features, including appropriate Imprivata licensing.
-
You configured the integration with Imprivata Enterprise Access Management.
-
The Imprivata appliances in your Imprivata enterprise must be running EAM 25.2 or later.
For more information on upgrading your Imprivata appliances, see the Imprivata Upgrade portal.
Requirements
-
Users in a policy enabled for face recognition must be synced from Active Directory (AD) to Entra ID.
-
The cloud must be synced from AD to Entra ID with Entra Connect.
-
Each user in scope for the facial recognition workflow must exist within Entra ID and each user must also be allocated a P1 or higher Microsoft license.
-
Internet access is required for facial biometric authentication.
If the device cannot connect with your Imprivata Cloud Platform, an error message will appear during authentication. In this scenario, the user can select another authentication method (password / Imprivata PIN, etc) to complete the authentication.
-
Imprivata Licensing: Face recognition authentication requires an Authentication Management license and a Remote Access license.
-
Imprivata Locker app requirements:
-
iOS — Imprivata Locker for iOS 4.0 or later.
-
Android — Imprivata Locker for Android 2.0 or later.
-
The user must grant access to the device's camera to use face recognition.
BEST PRACTICE:To ensure the highest quality possible, the initial enrollment of a user's face should be done without a mask.
Subsequent authentications can be done with a mask.
-
Additional Resources
For more information, see the Imprivata Enterprise Access Management online help.
Configure the Connection to the Imprivata Cloud Platform
Enabling Face recognition requires a connection to the Imprivata Cloud Platform. You need the following to complete the configuration:
-
Access to the Imprivata Appliance Console.
-
Access to the Imprivata Admin Console.
-
Optional — a PNG, JPG, or GIF of your organization logo (200 x 100 pixels or smaller, max 100KB).
If you have already configured a connection to the Imprivata Cloud Platform, you can skip this step.
You can use either of the following methods to configure the connection.
Before you begin:
-
Determine if a connection to the Imprivata Cloud Platform has already been configured by logging into the Imprivata Admin Console. The status of the connection is available in the Status panel on the right-hand side. A green check mark for Access Management integration indicates a connection has been configured.
-
If you need to configure the connection, contact Imprivata Services. Imprivata Services will create an Imprivata Cloud Platform tenant for your enterprise, and send a Welcome email with a link to the Imprivata Access Management setup. Click the link in the email and follow the setup to configure the connection.
Complete the following steps to use the Imprivata Access Management setup to configure the connection. To complete the configuration, you need the following:
-
Access to the Imprivata Appliance Console.
-
Access to the Imprivata Admin Console.
-
Optional — a PNG, JPG, or GIF of your organization logo (200 x 100 pixels or smaller, max 100KB).
Add the Required Hosts to Your Firewall Allowlist
Ensure that your firewall policy is configured to allow communication between the Imprivata appliances and the production Imprivata Cloud Platform.
Add the following hosts to your firewall allowlist:
-
<tenantID>.sys.imprivata.com
-
astra.sys.imprivata.com
-
<tenantID>.access.imprivata.com
-
access.imprivata.com
-
metadata.app.imprivata.com
-
file-access.app.imprivata.com
-
idp.app.imprivata.com
Consider the following:
-
For non-US regions, replace the
.comwith the appropriate domain suffix for your region, for example,*.sys.imprivata.eu. -
You can locate your Imprivata Cloud Platform tenant ID by clicking the link to the Imprivata Access Management setup in the welcome email. The tenant ID appears in the URL. For example:

Certificate Revocation Checking and Outbound Communication on TCP Port 80
Imprivata cloud services rely on standard TLS certificate validation performed by the client platform. Depending on the operating system, browser, connector, application, and local security policy, certificate validation may include revocation checking for the TLS certificates used to establish trusted connections. During certificate validation, the client may retrieve certificate revocation information from the issuing Certificate Authority (CA)."
The location of this information is published in the certificate itself:
-
The CRL Distribution Points (CDP) extension names where the Certificate Revocation List (CRL) can be downloaded
-
Where applicable, the Authority Information Access (AIA) extension names the OCSP responder that can be queried for a certificate's status.
The revocation data itself is not carried in the certificate; the client uses these pointers to fetch it from the CA's endpoints.
Some of those CA revocation endpoints are published as HTTP URLs and therefore require outbound access over TCP port 80.
-
This port 80 access is used only to retrieve CA-published certificate status information (CRLs or OCSP responses).
-
It is separate from the encrypted application connection to Imprivata cloud services, which uses HTTPS/TLS.
Administrators who restrict outbound HTTP traffic should allow outbound TCP port 80 only from the systems that connect to Imprivata cloud services, and only to the CA revocation endpoints required by the certificate chain.
-
Identify these endpoints from the CRL Distribution Points and Authority Information Access fields in the relevant certificates, or from the issuing CA's published revocation-service documentation.
-
Enforce the restriction through firewall, secure web gateway, or explicit proxy rules that allow only the required CA hostnames and revocation paths.
-
Allowlist by fully qualified hostname (FQDN), not by IP address.
CA revocation endpoints are frequently served from content delivery networks whose IP addresses change without notice; an IP-based rule will break silently when the CA rotates infrastructure.
General outbound web browsing over port 80 is not required, and no inbound port 80 access to the customer environment is required for this purpose.
Do not disable certificate revocation checking to work around blocked CRL or OCSP access. If a system cannot reach the required CA revocation endpoints, one of two things happens depending on the client's revocation policy:
-
Validation may hard-fail, and the connection is refused;
-
Validation may soft-fail, and the connection proceeds without confirming revocation status, silently weakening the protection the check was meant to provide.
Disabling revocation checking guarantees the second, weaker outcome for every connection.
Review these allowlist entries periodically. CA certificates, intermediate certificates, revocation endpoints, and CA infrastructure can all change over time.
Start the Imprivata Cloud Connect Service
By default, the Imprivata Cloud Connect service is disabled. You must enable the service before configuring the connection to the Imprivata Cloud Platform.
To start the service:
-
In the Imprivata Appliance Console, go to System > Operations.
-
Locate Imprivata Cloud Connect, and click Stop/restart options.
-
Select Restart Imprivata Cloud Connect on all appliances, and click Go.
Copy Your Enterprise Integration ID
Using the Imprivata Admin Console, copy your enterprise integration ID. You require this value to use the Imprivata Access Management setup to create an integration token.
To copy your integration ID:
-
In the Imprivata Admin Console, click the gear icon > Imprivata Access Management integrations.
NOTE:A status message of Unable to verify integration. Unable to connect to Imprivata Access Management is expected.
-
Copy the enterprise integration ID to your clipboard.
-
Do not log out. You finish configuring the connection here after using the Imprivata Access Management setup to create the integration token.
Create the Integration Token
Using the Imprivata Access Management setup, enter your enterprise integration ID to create an integration token. This token is required to finish configuring the connection in the Imprivata Admin Console.
To create the integration token:
-
Open the Imprivata Access Management setup.
-
If you have not already, agree to the Cloud Features Agreement and enter information about your organization.
-
Go to the Connect to Enterprise Access Management screen, and paste the integration ID into Enterprise integration ID.
-
Click Create integration token and copy it.
-
Return to the Imprivata Admin Console to finish configuring the connection.
Configure Entra ID as the Identity Provider
Use the Imprivata Access Management setup to create the Imprivata SP metadata file. You require this file when configuring the Entra ID enterprise application.
To create the metadata file:
-
Open the Imprivata Access Management setup.
-
Agree to the Cloud Features Agreement and enter information about your organization.
-
Skip to the Identity Provider Connect screen.
-
Copy the Imprivata SP metadata URL, paste it into a new browser tab, and save the page as an XML file.
Do not close the setup. You finish configuring the connection here after you configure the enterprise application.
An Entra ID enterprise application is required to allow SAML-based SSO to the Imprivata Access Management console.
To configure the enterprise application:
-
From the Azure portal, go to Microsoft Entra ID.
-
Click Manage > Enterprise Applications > New application.
-
Click Create your own application.
-
Enter a name for the application, select Integrate any other application you don't find in the gallery, and then click Create.
-
From the Overview page, click Assign users and groups, and then add the Imprivata admin user group.
-
Go to the Overview page, click Set up single sign-on, and then select SAML.
-
Click Upload metadata file, and upload the Imprivata SP metadata file you created previously.
-
Under Basic SAML Configuration, click Edit, and enter the following Sign on URL:
https://access.imprivata.com. -
Save the settings.
Copy and save required federation and group attribute values from the enterprise application. You will use these values to complete the SAML configuration and specify the Imprivata admin group.
To locate the required values:
-
Go to SAML certificates, and copy the App Federation Metadata URL.
-
Under Attributes & Claims, click Edit, and copy the claim name for the user groups value.
Example:
http://schemas.microsoft.com/ws/2008/06/identity/claims/groupsNOTE:If the user group claim does not exist, create it. When creating it, select Groups assigned to the application and use Group ID as the source attribute.
-
Return to the Microsoft Entra ID Overview page.
-
Click Manage > Groups >All groups.
-
Locate the admin group and copy its object ID.
Return to the Imprivata Access Management setup to finish the configuration.
With the federation and group attribute values you had previously saved, use the Imprivata Access Management setup to finish the SAML configuration and specify the Imprivata admin group.
To finish the configuration:
-
Open the Imprivata Access Management setup, and return to the Identity Provider Connect screen.
-
Enter your organization's domain and a user-friendly display name.
-
Enter the SAML IdP metadata URL from the enterprise application, and click Continue.
-
Enter the user group claim name in to SAML attribute name.
-
Enter the object ID of the admin group in to SAML attribute value, and click Continue.
If you are specifying multiple admin groups, the object IDs must be comma-separated.
-
Click access.imprivata.com to log in to the Imprivata Access Management portal.
Specifying a metadata URL allows for easier maintenance. The system automatically polls the URL at regular intervals.
This ensures that your IdP configuration stays up to date with the latest metadata, such as certificate changes.
If you upload a metadata file instead, the system does not update it automatically. From the Imprivata Access Management portal, you must edit the configuration to replace the file manually or switch to a URL.
Configure Any Other Third-Party IdP
The following are generic steps to configure any external third-party IdP to authenticate users to the Imprivata Access Management portal. For example, these steps apply to Ping Identity and Okta.
To configure your IdP:
-
Open the Imprivata Cloud Tenant Setup wizard.
-
If you have not already, agree to the Cloud Features Agreement and enter information about your organization.
-
Go to the Identity Provider Connect screen.
-
Copy the Imprivata SP metadata URL and provide it to your IdP. When configuring the IdP's application:
-
Specify
https://access.imprivata.comfor the single sign-on URL. -
Recommended: configure email address as the NameID format for user identity.
-
Recommended: configure Group ID (rather than group name) as the source attribute for group claims.
-
-
Enter the SAML IdP metadata URL, and click Continue.
-
Enter the SAML name/value pair that identifies users with administrative access, and click Continue.
-
Click Go to Access URL: access.imprivata.com to test the authentication workflow to access Imprivata Access Management.
Configure Microsoft Entra ID for EAM
Configure additional items in Microsoft Entra ID for Imprivata Enterprise Access Management face recognition.
After configuring Entra ID and syncing users with the Imprivata Cloud Platform, verify that the users exist in the Imprivata Access Management portal (access.imprivata.com).
To add the trusted Imprivata IP addresses:
-
From the Azure portal, go to Microsoft Entra ID, and select > Manage > Security > Manage > Named locations.
-
Click IP ranges location.
-
Enter a name for the new location, and then select Mark as trusted location.
-
Add the following IP addresses:
-
44.207.16.175/32 -
44.196.189.191/32 -
34.195.47.118/32
-
-
Click Add, and then Create.
If per-user multifactor authentication is enabled for users, adding the trusted Imprivata IP addressees to the list of MFA trusted IPs is required.
To add the IP addresses:
-
From the Microsoft Azure Portal, go to Microsoft Entra ID > Manage > Users, and click Per-user MFA.
-
Select the Service Settings tab.
-
Add the following IP addresses to Skip multifactor authentication for requests from following range of IP address subnets:
-
44.207.16.175/32 -
44.196.189.191/32 -
34.195.47.118/32
-
-
Click Save.
By default, Microsoft Entra Connect Sync pass-through authentication or Password Hash Sync (PHS) is supported.
-
If your environment is Entra ID only, neither pass-through authentication nor PHS is required.
-
If your Entra ID environment is federated with a third-party IdP, however, PHS is required.
To verify whether PHS is enabled:
-
From the Microsoft Azure Portal, go to Microsoft Entra ID > Manage > Microsoft Entra Connect.
-
Click Connect Sync.
-
Under Microsoft Entra Connect sync, verify that Password Hash Sync is enabled.
-
If it is not enabled, configure Password Hash Synchronization from the server where the Microsoft Entra Connect Sync Agent is installed.
Configure Imprivata Enterprise Access Management as a directory. Doing so, provides full user sync capabilities.
Syncing your users requires one of the following:
-
Entra ID Global Administrator rights
-
Privileged Role Administrator rights
To sync Entra ID users:
-
Log into the Imprivata Access Management portal (access.imprivata.com).
-
Click the gear icon > Users > Entra ID users.
-
Click Add an Entra ID directory now.
-
Enter your Entra ID Tenant ID, and click Continue to Microsoft Authentication.
-
Using an Entra ID Global Administrator account, or another account with privileges to grant admin consent for application permissions, log in to Entra ID.
-
When prompted, review the required permissions, and click Accept.
-
Click Specify groups now. Enter one or more groups names, and click OK.
-
Click Update now to sync users.
If your Entra ID environment is federated with a third-party IdP, this step is required.
The Imprivata Cloud Platform must be able to validate user passwords when entered. In a federated environment, Imprivata needs to avoid these calls from being redirected to the federated identity provider (IdP). You must change the home realm discovery policy for authentication from the Imprivata Cloud to your Entra ID tenant only. This only applies to authentication calls made by the Imprivata Access Management Sync.
To create and apply the Home Realm Discovery policy:
-
Log in to Microsoft Graph Explorer.
To make it more secure, log in as the Global Administrator.
-
Consent to the Microsoft Graph explorer application in your tenant.
For more information, see the Microsoft Graph API documentation.
-
Create a home realm discovery policy by making the following HTTP request:
POST - https://graph.microsoft.com/v1.0/policies/homeRealmDiscoveryPoliciesRequest body
In the request body, supply a JSON representation of the homeRealmDiscoveryPolicy object:
Copy{
"displayName": "yourPolicyName",
"definition": [
"{\"HomeRealmDiscoveryPolicy\":
{\"AllowCloudPasswordValidation\":true, } }"
],
"isOrganizationDefault": false
}Response
If successful, this method returns a
201 Createdresponse code and a new homeRealmDiscoveryPolicy object in the response body.Example Response
Copy{
"@odata.context": "https://graph.microsoft.com/v1.0/$metadata#policies/homeRealmDiscoveryPolicies",
"value": [
{
"id": "239cbead-1111-654a-9f50-1467d691aaa",
"deletedDateTime": null,
"definition": [
"{\"HomeRealmDiscoveryPolicy\" : { \"AllowCloudPasswordValidation\":true, } }"
],
"displayName": "Exclude Federated Authentication ",
"isOrganizationDefault": false
}
]
} -
Assign the home realm discovery policy to the Imprivata Access Management Sync application by making the following HTTP request:
POST - https://graph.microsoft.com/v1.0/servicePrincipals/<the Imprivata Access Management Sync application object id>/homeRealmDiscoveryPolicies/$ref
Request body
In the request body, supply the identifier of the homeRealmDiscoveryPolicy object that should be assigned.
Copy{
"@odata.id":"https://graph.microsoft.com/v1.0/policies/homeRealmDiscoveryPolicies/<yourHomeRealmDiscovery_PolicyID>"
}Response
If successful, this method returns a
204 No Contentresponse code. -
Verify that the home realm discovery policy was successfully applied to the service principal by making the following HTTP request:
GET - https://graph.microsoft.com/v1.0/policies/homeRealmDiscoveryPolicies/<homeRealmDiscoveryPolicy object id>/appliesTo
Response
Copy{
"@odata.context": "https://graph.microsoft.com/v1.0/$metadata#directoryObjects",
"value": [
{
"@odata.type": "#microsoft.graph.servicePrincipal",
"id": "c1f8e0d4-25b0-46b2-aaa8-827822631a33",
...
You must exclude the Imprivata Access Management Sync application from all conditional access policies that would require MFA for Imprivata users.
Microsoft-managed policies don't allow you to exclude specific cloud apps. If you have a Microsoft-managed policy that requires MFA, recreate it so you can exclude the Imprivata Access Management Sync app, and then turn off the Microsoft-managed policy.
To update a conditional access policy:
-
From the Microsoft Azure Portal, go to Microsoft Entra ID, select Manage > Security > Protect > Conditional Access > Policies.
-
Click the policy that applies to your Imprivata users.
-
Under Target resources, click All resources (formerly All Cloud apps).
-
Click Exclude, and then toggle Select resources.
-
Under Select specific resources, click None or any of the listed applications.
-
Search for Imprivata Access Management Sync, select it, and click Select.
-
Save the policy.
-
Repeat for all conditional access policies that would require MFA for Imprivata users.
Configure Enterprise Access Management
In Enterprise Access Management, configure the user policy authentication methods and grace periods for MAM.
-
In the Enterprise Access Management Admin Console, go to the User policies page > Authentication tab > Desktop Access authentication section.
-
In the Primary factors column, select Face recognition.
-
In the Second factors column, select another factor for use with face recognition:
-
no second factor (Not recommended)
-
In EAM 25.3, the Imprivata Admin Console still displays the option for no second factor. It is not a recommended configuration.
-
In EAM 25.4 and later, the no second factor option has been removed.
-
-
Security Key
-
Imprivata PIN
-
Proximity Card
-
Security Key or Imprivata PIN or Proximity Card
Click to enlarge

BEST PRACTICE:For enhanced protection against sophisticated attacks, pair Face recognition authentication with a strong second factor like proximity card.
-
-
In the Primary factors column, select another primary factor and its corresponding second factor.
Specifying additional authentication methods allows users in the policy to authenticate to the device when face recognition is not available. For example, when face recognition is not available, the users must authenticate via password + Imprivata ID.
-
Click Save.
Depending on the authentication methods defined in the user policy and computer policy, ensure that you have configured the appropriate grace periods for the second authentication factor.
For example, when using proximity cards as the second authentication factor, you can set a grace period for the second authentication factor after successful authentication, up to 24 hours 59 minutes.
The settings are available in the Authentication method options section of the Authentication tab in the Imprivata Admin Console.
Mobile Access Management organizations with Check Out using EAM as the Identity provider (IdP) create a host (computer) in EAM for every Launchpad registered. That computer in EAM gets a computer policy which must have a proximity card enabled to be able to perform a checkout with a proximity card tap.
-
Confirm that there is no override in the computer policy that the Launchpads are assigned to. If the Launchpads are assigned to the Default Computer Policy, no changes should be needed.
-
MAM's iOS devices are displayed in the Imprivata Admin Console as Prove ID Web devices; confirm that the mobile devices are in the Default Computer Policy. If they are assigned to the Default Computer Policy, no changes should be needed.
-
Confirm that the user policies your mobile users are assigned to allow proximity cards as a primary factor.
If all of the above conditions are true, no changes are needed.
-
However, if an override is already enabled within the computer policy the Launchpads are in, ensure that Proximity Card is allowed in the override.
-
If this is not possible or allowed for your organization, Imprivata recommends moving the Launchpads and devices into a separate computer policy.
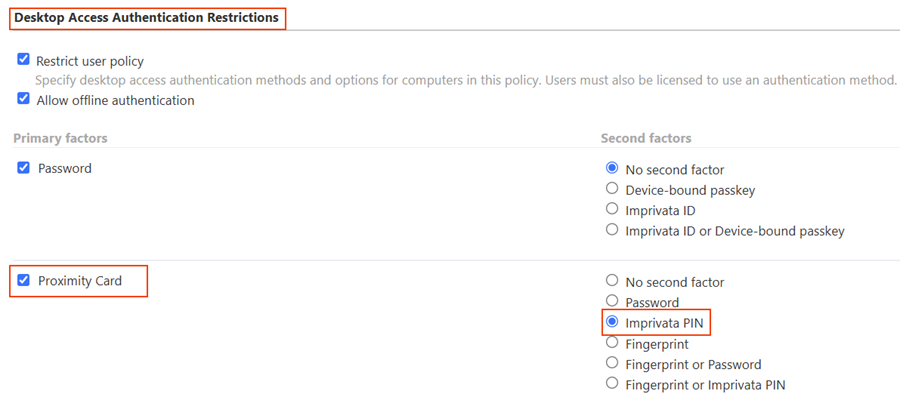
If you've performed the validations above, and computer policy changes are needed for your environment, follow these steps.
-
In the Imprivata Admin Console, go to Computers > Computer policies and select the computer policy your Launchpad is using.
-
In Override and Restrict tab > Desktop Access Authentication Restrictions section, make sure that the option for Proximity Card is selected (enabled).
Click to enlarge