Supporting Citrix NetScaler Gateway RfWebUI Portal Theme
Imprivata Enterprise Access Management (formerly Imprivata Confirm ID) supports Remote Access integration with Citrix NetScaler Gateway 11.1.
To configure two-factor authentication with Enterprise Access Management and Citrix NetScaler Gateway, start with Remote Access with Citrix NetScaler Gateway.
However, if you have enabled Imprivata's graphical user interface for your RADIUS client, and you are using NetScaler 11.1's RfWebUI Portal Theme (Receiver for Web UI), configuration of a Rewrite Action and Policy applied to your virtual server is required. If you must use NetScaler's RfWebUI Portal Theme, users will not be able to log in without the configuration described in this topic.
Example: Configuration Required
When you have integrated Citrix NetScaler with Enterprise Access Management, but you have not successfully configured the Rewrite Policy and Action as described below: After users enter their username and first factor authentication (password, for example),
-
The RfWebUI theme will not display the Enterprise Access Management graphical user interface;
-
A string of JSON code will appear in the NetScaler user interface;
-
The user will be unable to enter their second-factor authentication;
-
The user will be unable to proceed.
Example: Configuration Success
When you have integrated Citrix NetScaler with Enterprise Access Management, and you have successfully configured the Rewrite Policy and Action as described below:
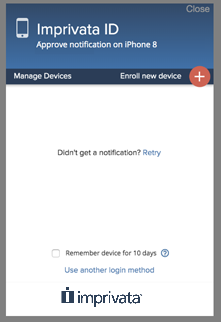
After users enter their username and first factor authentication (password, for example), the Enterprise Access Management user interface will appear and prompt the user to complete second factor authentication (Imprivata ID in this example):
Configure the Rewrite Policy and Action
To configure the rewrite policy and action via the command-line interface, SSH into the NetScaler server and enter the following commands with specific customizations for your enterprise:
config> add rewrite action example_rewrite_action INSERT_BEFORE_ALL HTTP.RES.BODY(1000000)
'"<script src=\'https://impr1.co/3/nr.js\'></script>"' -search Text("</body>")

config> add rewrite policy example_rewrite_policy HTTP.REQ.URL.ENDSWITH("logon/LogonPoint/index.html") example_rewrite_action

config> bind vpn vserver example_server -policy example_rewrite_policy -type RESPONSE
-priority 100 -gotoPriorityExpression end
Edit these commands as follows:
-
example_rewrite_action— Give the Rewrite Action a descriptive name; -
example_rewrite_policy— Give the Rewrite Policy a descriptive name; -
example_server— Use the actual vserver name; -
logon/LogonPoint/index.html— this the default path to the NetScaler login screen. If your login screen URL is different, edit this string to match.
Configure the Rewrite Policy and Action via GUI
You can configure these same settings manually in the Citrix NetScaler VPX graphical user interface:
Create A Rewrite Policy
-
In the Citrix NetScaler VPX, select the virtual server where the RfWebUI Theme is in use.
-
In the Policies section, click the + button to add a policy.
-
In the Choose Type window, choose Policy: Rewrite and Type: Response.
-
Click Continue.
-
On the Choose Type screen > Policy Binding section, click the + button to create the policy.
-
Edit the policy you've just created:
-
Give the policy a descriptive name.
-
Leave the Undefined-Result-Action as the default
-
Set the Expression as:
HTTP.REQ.URL.ENDSWITH("logon/LogonPoint/index.html")The string inside the quotes is the default path to the NetScaler login screen. If your login screen URL is different, edit this string to match.
-
Click Create.
After this policy is created, you will see it listed on the virtual server page > Policies > Response Policies ("1 Rewrite Policy", for example).
-
-
To continue creating this policy you need to create a Rewrite Action and select it for this policy. See Create A Rewrite Action below.
Create A Rewrite Action
This Rewrite Action will insert an Imprivata script into your login page HTML code. When successful, you can view the source of your login page HTML and find this code (usually very close to the end, near the </body> tag).
-
In the Configure Rewrite Policy window, go to the Action field and click the + button to create a Rewrite Action.
-
Configure the Rewrite Action you've just created:
-
Give the policy a descriptive name.
-
Set the Type as INSERT_BEFORE_ALL
-
Set the Expression to choose target location as
HTTP.RES.BODY(10000000) -
Set the Expression as:
"<script src='https://impr1.co/3/nr.js'></script>"(including the double quotes) -
Select the Search radio button, set the field to Text, and the string
</body> -
Click Create.
-
-
Return to the Rewrite Policy you created earlier and in the Action field, select this Rewrite Action and then click OK to save your change.
-
To complete creating this policy you need to bind the rewrite policy and action to the virtual server. See Bind Policy to Virtual Server below.
Bind Policy to Virtual Server
After the rewrite policy and action have been created, your new rewrite policy will appear on the Choose Type screen. If necessary, change the priority and/or goto expression, then click Bind to bind the policy to the virtual server.