Remote Access with Citrix NetScaler Gateway — Legacy RADIUS Experience
Imprivata Enterprise Access Management (formerly Imprivata Confirm ID) integrates with Citrix NetScaler Gateway to streamline authentication management and simplify two-factor authentication for remote access for employees. In addition to logging in remotely, Enterprise Access Management users can also enroll authentication methods from outside your network.
Enterprise Access Management also offers a customized user interface for Citrix NetScaler. When logging in remotely and enrolling authentication methods, the user interface will closely resemble the Imprivata enrollment utility on the Imprivata agent.
Before You Begin
Review Enterprise Access Management MFA Supported Components to confirm that your version of Citrix NetScaler Gateway is supported. Fully configure your Citrix NetScaler Gateway environment for remote access with single-factor username and password authentication before configuring its connection to Imprivata.
To plan your rollout and learn how Remote Access works, start here.
Best Practice — Use Graphical User Interface on the Web Portal
Enterprise Access Management offers a graphical user interface for your users when logging in remotely and enrolling authentication methods. You can enable this interface with one click when setting up the Imprivata RADIUS host below.
Remote Access with Imprivata ID
This is one example of a typical Remote Access configuration; your gateway software and Enterprise Access Management configuration may vary.
Diagram: Two-Factor Remote Access Authentication
click to enlarge

- The user initiates primary authentication to the Citrix NetScaler Gateway.
- The Citrix NetScaler Gateway sends a RADIUS access request to the Imprivata appliance.
- The Imprivata appliance sends a push token request to the Imprivata Cloud Token Service.
- Imprivata Cloud Token Service sends a push notification to the Imprivata ID app on the user's device.
- The user accepts the push notification from the Imprivata ID app, and the device sends a token to the Imprivata Cloud Token Service.
- The Imprivata Cloud Token Service sends a push token accept to the Imprivata appliance.
- The Imprivata appliance sends RADIUS access accept to the Citrix NetScaler Gateway.
- The Citrix NetScaler Gateway access granted to the user.
Configure Imprivata Remote Access
Add a New RADIUS Client
To enable Imprivata to serve your RADIUS client, name your RADIUS client and configure the NAS address / SNIP address on the Imprivata Admin Console:
- In the Imprivata Admin Console, go to Applications > Remote access integrations.
- Click Add new RADIUS client.
- On the Add new RADIUS client screen:
-
- Select a Client type
- Enter a descriptive Client name
- Enter the Hostname or IP address of the RADIUS client. (The RADIUS client may also be referred to as the Network Access Server (NAS) or VPN Server);
- Enter the Encryption key (shared secret).
-
BEST PRACTICE: This encryption key will be used as a shared secret between your server and RADIUS client. Use a computer-generated string of 22 to 64 characters in length.
You do not need to repeat this process for each Imprivata appliance. This client configuration is distributed to all Imprivata appliances in your enterprise.
- Click Save.
Optional — Non-licensed User Access
When you integrate Enterprise Access Management Remote Access with your gateway, the following users will be blocked from logging in:
-
Enterprise Access Management users who are not licensed for Remote Access, and
-
All non-Imprivata users: users not synced with the Imprivata users list.
However, you can override this default behavior and allow remote access for these users:
-
In the Imprivata Admin Console, go to Applications > Remote access integrations.
-
Select the RADIUS client.
-
In the section Non-licensed user access, select Allow remote access for users without a Confirm ID for Remote Access license.
-
Click Save.
This option uses Active Directory authentication for these users only, bypassing Enterprise Access Management authentication.
Active Directory Groups Queried
Users synced with the Imprivata appliance — The Imprivata appliance will query direct group and nested group memberships.
Users not synced with the Imprivata appliance — The Imprivata appliance will only query direct group memberships.
Troubleshooting — Nested Groups Not Queried
If you allow non-licensed user access and a non-Imprivata user is still blocked from Remote Access, their Active Directory group may be nested and not queried in this Remote Access Log In workflow.
Example — A user who is a member of Group1, where Group1 is a member of Group2 is not considered to be a member of Group2 and will not be queried for non-Imprivata users attempting Remote Access.
If you need to provide remote access to non-Imprivata users in nested groups, sync them with the Imprivata appliance. You do not need to license them for any Imprivata features. The sync alone will cause them to be queried by Enterprise Access Management for Remote Access.
CAUTION: All users synced with the Imprivata appliance must be added to a user policy. If you do not want these users consuming any licenses, verify that the user policy they're added to consumes no licenses (the Imprivata Admin Console may present a Caution on this user policy stating these users will not be able to log in; this message can be ignored in this specific case).
Optional - Configure RADIUS Group Attributes
Some RADIUS clients demand return information about authenticating users in the form of RADIUS attributes.
Troubleshooting The RADIUS Connection
You can troubleshoot the connection between your RADIUS client and the Imprivata appliance by viewing serverProxy.log:
-
On the Imprivata appliance, go to System > Logs.
-
In the section Log data export, export the log data for the period you wish to troubleshoot.
-
Click View files.
-
In the index of logs, open RadiusENA/serverProxy.log.gz
-
The communication between the RADIUS client and the Imprivata appliance is logged here.
Examples
- If you see the message Source IP address [ip address] does not have a NAS entry, the IP address for the RADIUS client may have been entered incorrectly or not configured at all.
- If you see no entries in the log, and the Imprivata appliance does not respond to the request from the RADIUS client, this may mean:
- The IP address for the Imprivata appliance was not entered properly on the RADIUS client.
- The authentication port for the Imprivata appliance was not set to 1812 on the RADIUS client.
- If you see the message The Remote Authentication failed, either because the assigned user policy has no permission configured in the Authentication subtab OR the user's credentials failed, this may mean:
- The encryption key (shared secret) does not match on the RADIUS client and the Imprivata appliance; or
- The RADIUS client is configured to use an unsupported protocol.
- Push Notifications — If the Imprivata Admin Console reports an authentication via push notification succeeded, but the RADIUS client reports the authentication timed out, the timeout value on the RADIUS client may need to be increased.
To create and run a RADIUS Activity report, in the Imprivata Admin Console, go to Reports > Add new report.
Configure the Citrix NetScaler Gateway VPN
Add a virtual server, configure RADIUS as your primary authentication method, and create a secret key.
- On the Citrix NetScaler Gateway Configuration Utility, go to the Configuration tab > NetScaler Gateway > Virtual Servers.
- Click Add.
- Enter a name and IP address for your virtual server.
- Set the port to 443.
- Click OK.
- Set the binding to your server certificate.
- In the section Authentication, click the plus sign to add a primary authentication method.
- Select RADIUS Policy and set the Type to Primary.
- In the section Authentication, click the name RADIUS Policy. The VPN Virtual Server Authentication RADIUS Policy Binding window opens.
- Click the policy to highlight it and then cllick Edit > Edit neo.server label.
- In the Configure Authentication RADIUS Server window, enter a name.
- In the IP Address field, enter Imprivata appliance / RADIUS server IP address.
-
NOTE: If you will be using Citrix NetScaler Gateway to configure load balancing directly, enter the SNIP for RADIUS source IP address (NAS) here. See Citrix NetScaler RADIUS Load Balancing.
- The Port for Imprivata appliances = 1812.
- Create a secret key to enter here. You will also enter this key as the "encryption key" in the Imprivata Admin Console (see Imprivata Remote Access).
- Click Done.
- In the Policies section, click the policy to highlight it, and then click Edit > Edit Policy.
- If your RADIUS server is not selected, select it now.
- Set the Expression to ns_true.
- Click OK.
NOTE: The Enterprise Access Management (Imprivata Confirm ID) RADIUS server only supports PAP protocol. CHAP protocols are not supported. Configure your RADIUS clients for PAP protocol to support Enterprise Access Management.
Optional — Native Citrix Workspace app Support
Enterprise Access Management supports remote access via native Citrix Workspace app, but the following configuration is required if you need to provide remote access via native Citrix Workspace app and remote Citrix access via the web portal.
In this section, configure one Citrix server for the web portal, and direct the native Citrix Workspace app to a subnet IP address. Then configure Enterprise Access Management for two separate Remote Access clients.
NetScaler Network IP Addresses
-
Log into the Citrix NetScaler Admin page > Configuration > System > Network > IPs
-
Make a note of the IP addresses: NetScaler IP and Subnet IP.
Add Two RADIUS Clients
In this section, set up two RADUIS clients: one for traffic from the Citrix web portal, and one for traffic from the native Citrix Workspace app. The web portal can use Enterprise Access Management's graphical user interface, while the native Citrix Workspace app must use the text-based interface.
- In the Imprivata Admin Console go to Applications > Remote access integrations.
- Click Add new RADIUS client.
- Add a Citrix NetScaler RADIUS client using the NetScaler IP.
- Select the graphical user interface.
- Add a second Citrix NetScaler RADIUS client using the Subnet IP.
- Select the Text-based user interface.
- For more details, see Add a New RADIUS Client above.
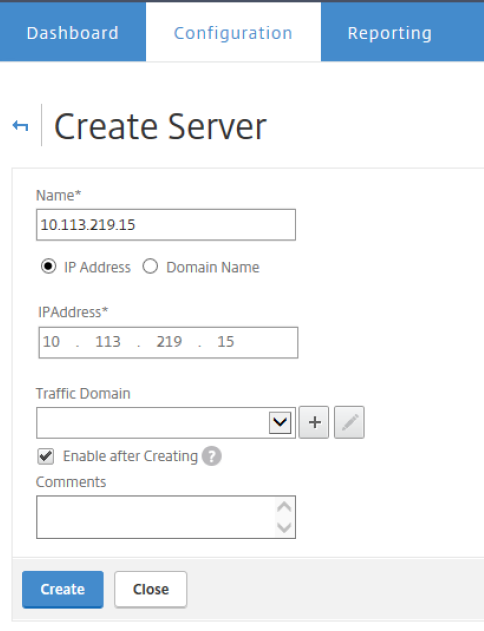
Create a Load Balancing Server
- Log into the Citrix NetScaler Admin page > Configuration > Traffic Management > Load Balancing > Server and click Add.
- Create a load balancing server: Enter your Imprivata appliance information.
- Click Create.
-
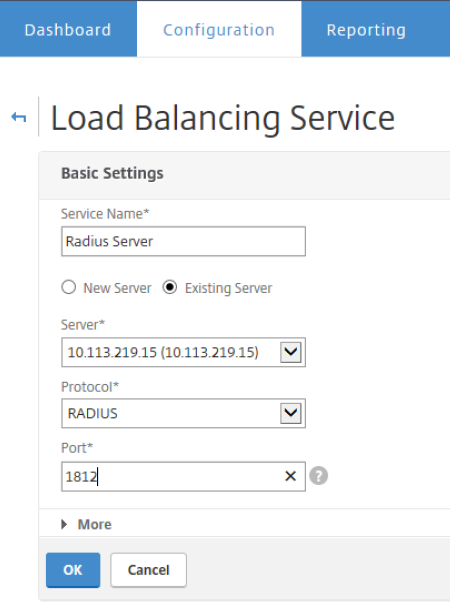
Create a Load Balancing Service
- Go to the Citrix NetScaler Admin page > Configuration > Traffic Management > Load Balancing > Services and click Add.
- Create a load balancing service: Use the just-created load balancing server as the service provider.
- Click OK.
-
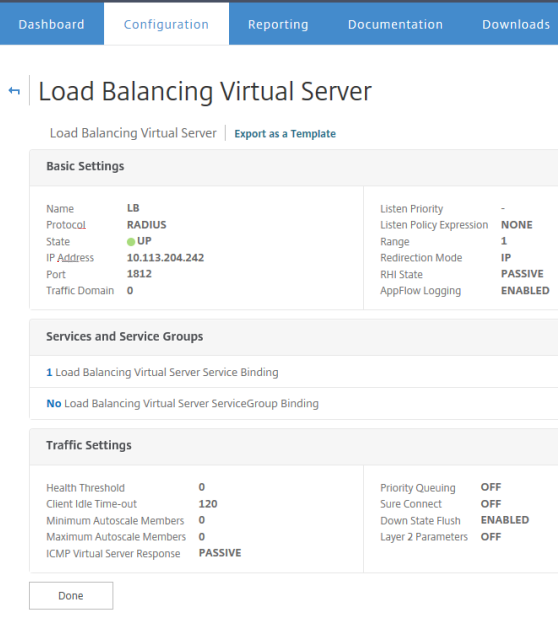
Create a Load Balancing Virtual Server
- Go to the Citrix NetScaler Admin page > Configuration > Traffic Management > Load Balancing > Virtual Servers and click Add.
- Create a load balancing virtual server:
- Protocol = RADIUS;
- Enter a domain IP address;
- RADIUS port = 1812
- Bind the just-created load balancing service to the virtual server.
- Click Done.
-
Create an Authentication RADIUS Server
- Go to the Citrix NetScaler Admin page > Policies > Authentication > RADIUS > Servers.
- Create an authentication RADIUS server by using the just-created Load Balancing Virtual Server:
- Create a secret key to enter here. You will also enter this key as the "encryption key" in the Imprivata Admin Console (see Imprivata Remote Access).
- Change the Time-out value to 30 seconds or greater.
- Click Create.
-

Create Two RADIUS Authentication Policies
- Go to the Citrix NetScaler Admin page > Policies > Authentication > RADIUS > Policies.
- Bind one policy to the normal Imprivata appliance, and the other policy to the just-created RADIUS "load balancing" virtual server which is, in reality, also pointing to the Imprivata appliance.
-

Bind RADIUS Authentication Policies to the Virtual Server
Bind the two RADIUS authentication policies to the NetScaler Gateway Virtual Server for the user login interface:
- Go to the Citrix NetScaler Admin page > Virtual Gateways.
- Add or configure a gateway virtual server and bind the two RADIUS authentication policies to the virtual server.
Optional — Citrix NetScaler RADIUS Load Balancing
BEST PRACTICE: In large deployments, configure load balancing to distribute RADIUS authentications among Imprivata appliances within the Imprivata enterprise.
This section describes how to configure the Citrix NetScaler Gateway load balancer to distribute the traffic load to all your Imprivata appliances in production. If your Citrix NetScaler Gateway license does not include load balancing, another load balancing solution should be used to distribute RADIUS traffic from the Citrix NetScaler Gateway to all your Imprivata appliances in production.
In a large deployment, you should not configure the Citrix NetScaler Gateway to send all RADIUS requests to one Imprivata appliance.
On the Citrix NetScaler Gateway Configuration Utility, go to the Configuration tab > Traffic Management > Load Balancing > Servers:
- Create Servers: Add the names and IP addresses or domain names for each Imprivata production appliance in your enterprise.
- Add A Service Group: Add your Imprivata appliances into a service group. Configuring a service group enables you to manage a group of Imprivata appliances as easily as a single appliance.
- Add a Virtual Server: Add a Virtual Server for your service group.
Optional — Returning An Active Directory Password in the RADIUS Response
Imprivata Confirm ID can be configured to return the authenticating user's Active Directory (AD) password back to the RADIUS client as part of the RADIUS Accept-Accept response.
The objective of this functionality is to eliminate the need for users to provide their AD password when authenticating to their VPN or VPN SSL box with other authentication methods such as VASCO, RSA, Imprivata ID, or SMS authentication. Allowing the VPN client to use the user’s cached AD password to avoid challenging the user when they access AD-based resources. The AD password will be returned using the RADIUS PAP protocol. Due to limitations in the PAP protocol, the AD password will not be encrypted.
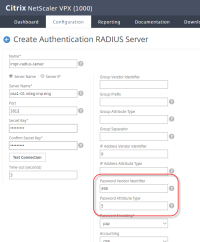
To configure the Citrix NetScaler Gateway to consume the user's AD password via a RADIUS attribute, set the Password Vendor Identifier and Password Attribute Type when configuring the RADIUS server. The RADIUS attribute will need to be added to the RADIUS host on the Imprivata appliance to send the AD password. The following steps demonstrate how to configure the Citrix NetScaler Gateway and the Imprivata appliance.
- On the Citrix NetScaler Gateway, configure the Authentication RADIUS server (Password Vendor Identifier = 398; Password Attribute Type = 5)
- In the Imprivata Admin Console, go to Applications > Remote access integrations > RADIUS attributes.
- Add attribute (Attribute Number = 26, Vendor Code = 398, Vendor-Specific Attribute Number = 5, and Attribute Value = %password%


Allow or Restrict Access Based on RADIUS Attributes
Review your Authorization Policy to determine if Citrix Netscaler limits remote access by Active Directory groups. If yes, then you need to configure Enterprise Access Management to send specific extended attributes so Citrix receives this information via the Imprivata RADIUS server.
If you review your Authorization Policy and determine Citrix Netscaler does not limit remote access by Active Directory groups, skip this section.
- Configure the group attributes that the RADIUS client (NetScaler) will receive from the RADIUS server (Imprivata). This can be vendor-specific attributes (VSA) or RADIUS well-known attributes such Class attribute type 25, shown:
-
click to enlarge
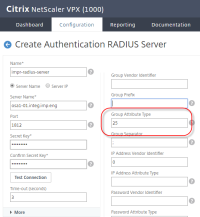
- NetScaler will listen for this attribute type when receiving group information from the Imprivata appliance. Attribute type 25 is a well-known RADIUS class attribute.
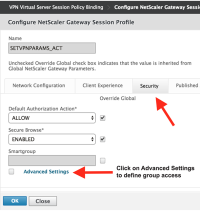
- Edit the NetScaler session policy for the virtual server. Go to the Security tab > Advanced Settings:
-
click to enlarge
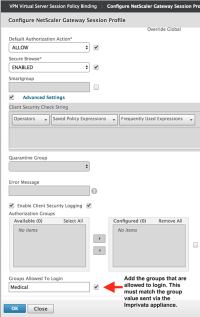
- Next to the "Allow Groups to Login" textbox, click the checkbox to enable the field.
- Enter the names of the Class Attributes that will be allowed to log into the VPN.
- This attribute value is sent in the RADIUS Access-Accept packet during a successful authentication. If the Class attribute matches the value sent, the user will be allowed to login.
-
click to enlarge
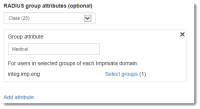
- Server Group configuration:
-
- Sending groups using RADIUS well-known attribute type 25
- The group attribute value will be sent to the RADIUS client if the user is a member of anyone of the AD groups selected.
-
click to enlarge


Optional — Configure the VPN via the CLI
You may find it easier to configure Citrix NetScaler via the CLI.
Parameters (example)
- virtual server name = VS191
- virtual server IP address = 10.113.213.191
- certificate name = MyCompanyCert
- radius server name = VS191_RADIUS_SERVER
- radius server IP address = 10.113.204.60
- radius policy name = VS191_RADIUS_POLICY
Command Line Configuration
config> vpn vserver VS191 ssl -state enabled 10.113.213.191 443

config> exit

config> bind ssl vserver VS191 -certkeyName "MyCompanyCert"

config> authentication radiusACtion VS191_RADIUS_SERVER -serverIP 10.113.204.60
-radKey password

config> serverPort 1812

config> authTimeout 60

config> exit

config> authentication radiusPolicy VS191_RADIUS_POLICY ns_true VS191_RADIUS_SERVER

config> exit

config> bind vpn vserver VS191 -policy VS191_RADIUS_POLICY -priority 100

config> bind vpn vserver VS191 -policy SETVPNPARAMS_POL -priority 100